Ready
Building a production-ready IoT platform is hard.
Teams must handle secure device authentication, multi-protocol messaging, scalability, multi-tenancy, and real-time data flow across cloud and edge environments. Many solutions solve only part of the problem.This leaves engineers to stitch together brokers, authentication systems, and custom services.
For engineering leads looking at IoT platforms, the choice involves more than just features. It focuses on long-term maintenance, overall cost, and lowering operational risk. A platform that ties you to proprietary protocols or a single architecture builds up technical debt as your fleet grows. Open-source, modular platforms help prevent this. They give teams complete control over their setup.They allow swapping components without rewriting integrations. Further, they provide a straightforward route from proof-of-concept to production without being locked into a vendor.
Magistrala is designed to address this challenge with a modular, scalable, and secure IoT platform built for real-world deployments. Unlike managed IoT clouds such as AWS IoT Core or Azure IoT Hub, Magistrala can be self-hosted. This keeps infrastructure costs predictable and data sovereignty under your control. Compared to lightweight brokers like Mosquitto, Magistrala provides a full application layer — device identity, multi-tenancy, access control, rules engine, and dashboards. All this with support for multiple protocols. This is all out of the box! This reduces the custom glue code teams would otherwise need to build and maintain.
Table of Contents
- Why Magistrala’s Architecture Matters
- Core Concepts
- Prerequisites
- Running Magistrala Locally
- Using Magistrala Cloud
- Creating Your First IoT Flow
- Conclusion
Why Magistrala’s Architecture Matters
Magistrala is built as a microservices-based IoT platform, and that architectural choice is deliberate. Each service — authentication, messaging, storage, rules — runs independently. This means teams can scale bottlenecks in isolation, deploy updates to one service without downtime in others, and replace individual components (e.g., swapping the message broker or database) as requirements evolve.
Some of the key architectural benefits include:
- Secure device identity and access control — Every client authenticates with unique credentials scoped to a domain, giving operators fine-grained control over who and what can access the platform. For enterprises managing multiple tenants or customer environments, this is table stakes.
- Multi-protocol support — Devices in the field speak different protocols (MQTT, HTTP, CoAP, WebSocket). Magistrala normalizes all of these behind protocol adapters that feed into a unified message broker, so application logic doesn’t need to care which protocol a device uses.
- Scalable message handling — The message broker and event streaming layer (backed by NATS) decouples ingestion from processing. This lets teams handle bursty traffic from thousands of devices without back-pressure affecting upstream services.
- Multi-tenancy — Domains provide hard isolation between tenants, their devices, channels, and data. This is critical for B2B SaaS providers or large organizations with multiple business units sharing a single deployment.
- Open-source and extensible — The entire codebase is Apache-2.0 licensed. Teams can audit the code, contribute upstream, and extend the platform without waiting on a vendor roadmap.
Core Concepts
Magistrala’s architecture revolves around a few core concepts that are helpful to understand when getting started:
-
Clients - Represent physical or virtual devices with unique credentials. Can be an IoT device, application, or service.
-
Channels - Secure communication paths controlling message flow.
-
Groups - Logical collections of clients and channels for easier management. Logical collections of clients and channels for easier management.
-
Domains - Multi-tenant environments isolating groups, clients, and channels.
-
Protocol Adapters - Support MQTT, HTTP, CoAP, and WebSocket, feeding into a unified broker.
In this guide, we will walk through setting up a local Magistrala instance, creating a simple IoT flow, and understanding the architecture in action.
Prerequisites
- Docker (version 26.0+)
Running Magistrala Locally
With Docker installed, we can clone the Magistrala repository and quickly start up the platform using the provided Makefile.
We can interact with the platform using the Magistrala CLI, the API, or the Magistrala-UI.
NOTE: To use the Magistrala-UI, you will need to accept the End User License Agreement (EULA). To do this locally, we will set the
MG_UI_DOCKER_ACCEPT_EULAenvironment variable toyesbefore running themake run_stablecommand.
git clone https://github.com/absmach/magistrala.git
cd magistrala
export MG_UI_DOCKER_ACCEPT_EULA=yes
## To run the latest stable(tagged) version
make run_stable
The above command will start all the necessary containers for a local Magistrala instance. The UI will be available at http://localhost:3000.
Using Magistrala Cloud
If you prefer not to run Magistrala locally, you can sign up for a free account on Magistrala Cloud. This hosted version provides the same features without the need for local setup. It also includes additional cloud-specific features like managed scaling and Social Sign-On (SSO). Try it today!
Creating Your First IoT Flow
To demonstrate Magistrala’s capabilities, we will create a simple flow where a device sends temperature data to the platform, and we visualize it in real-time. The flow will involve:
- Creating a user and a domain
- Creating a client (device)
- Setting up a channel for communication and connecting the client to it
- Creating a rule to store data from the device into the internal database
- Simulating the device sending temperature data
- Visualizing the data on a dashboard
Step 1: Create a User and Domain
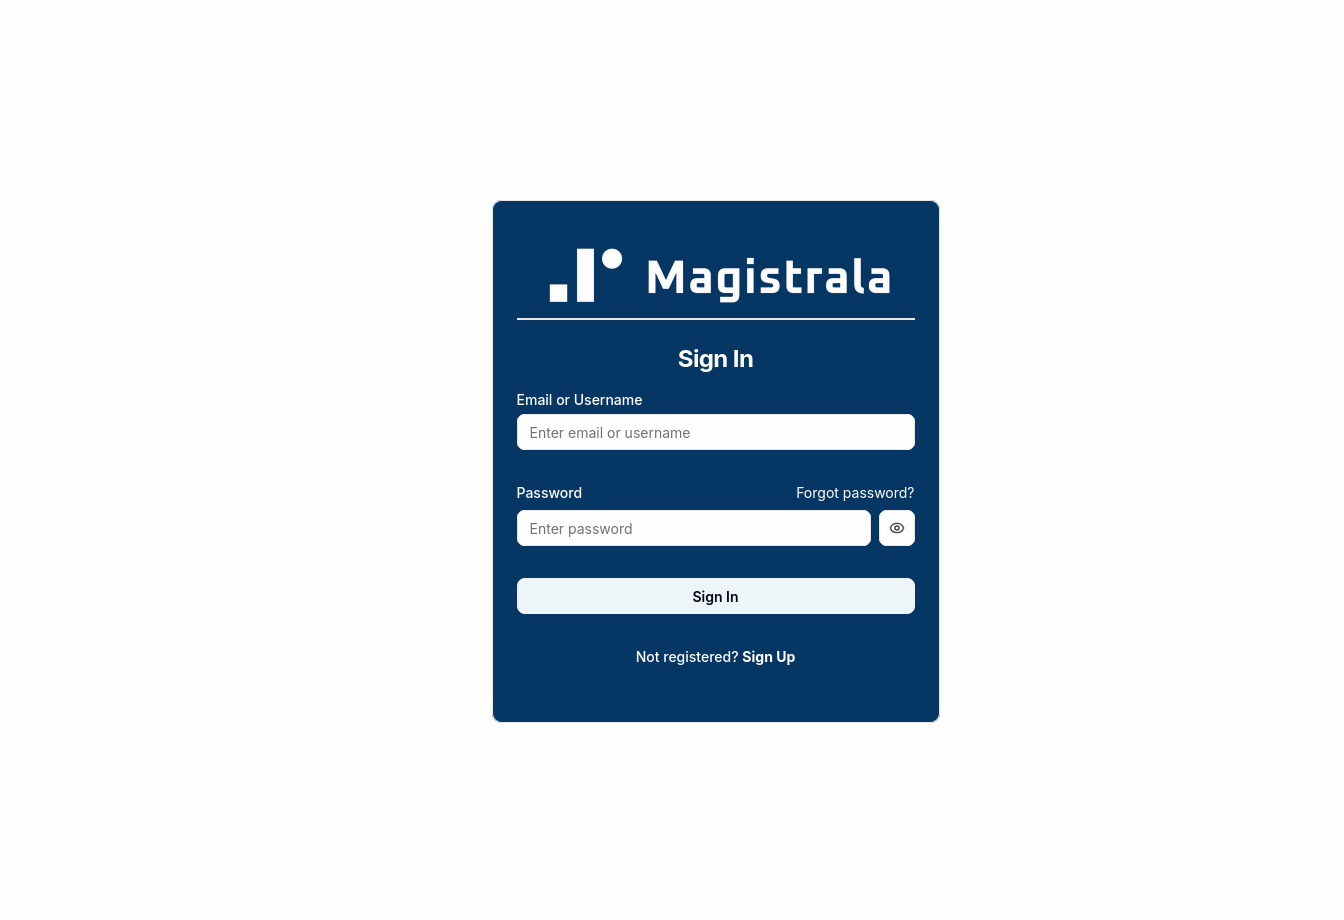
The landing page of the Magistrala-UI is the login page. As we do not have an account yet, we will click on the “Sign Up” button to create a new account.
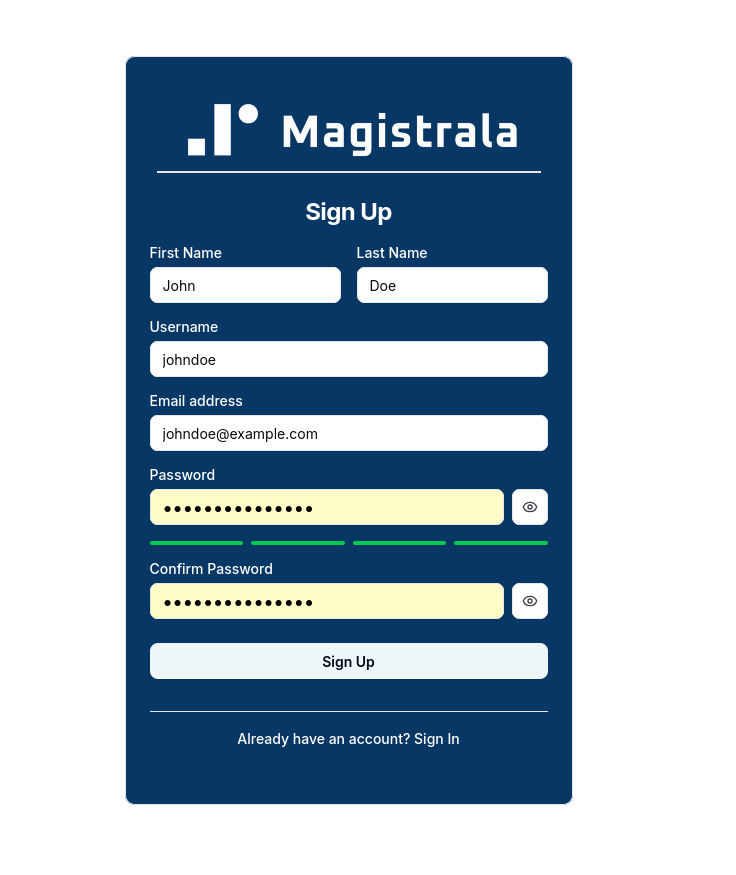
After filling in the required information and submitting the form, we will be logged in and taken to the domains page.
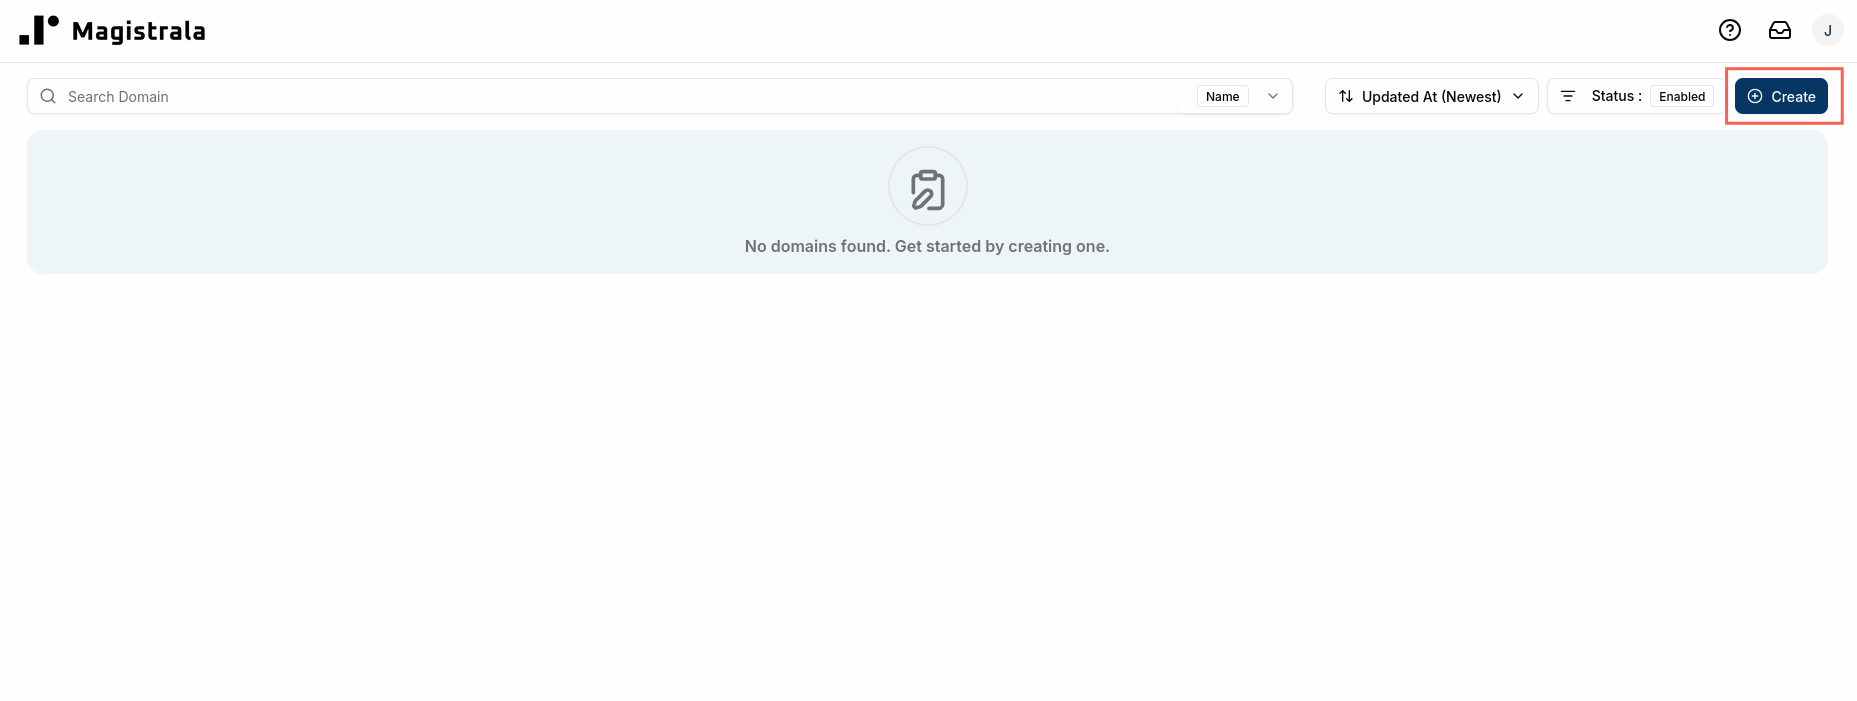
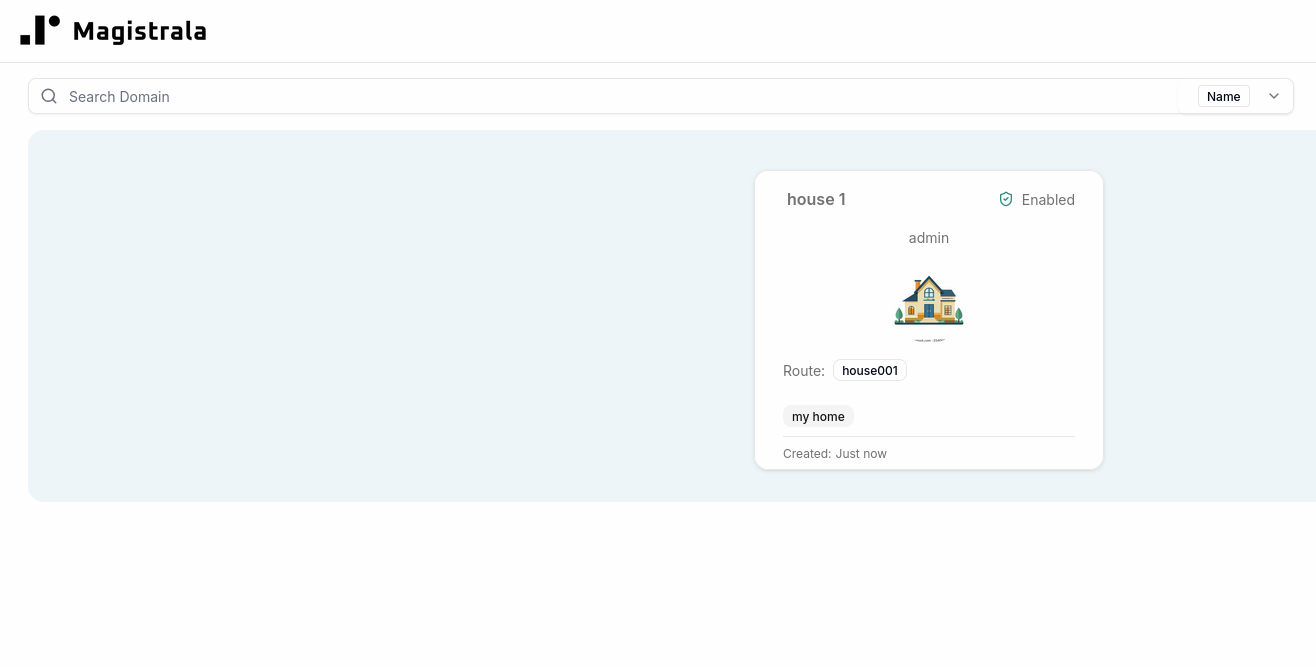
We can now create a new domain by clicking on the “Create Domain” button. We will give our domain a name and a unique route. The route can be used by devices when sending messages to the platform.

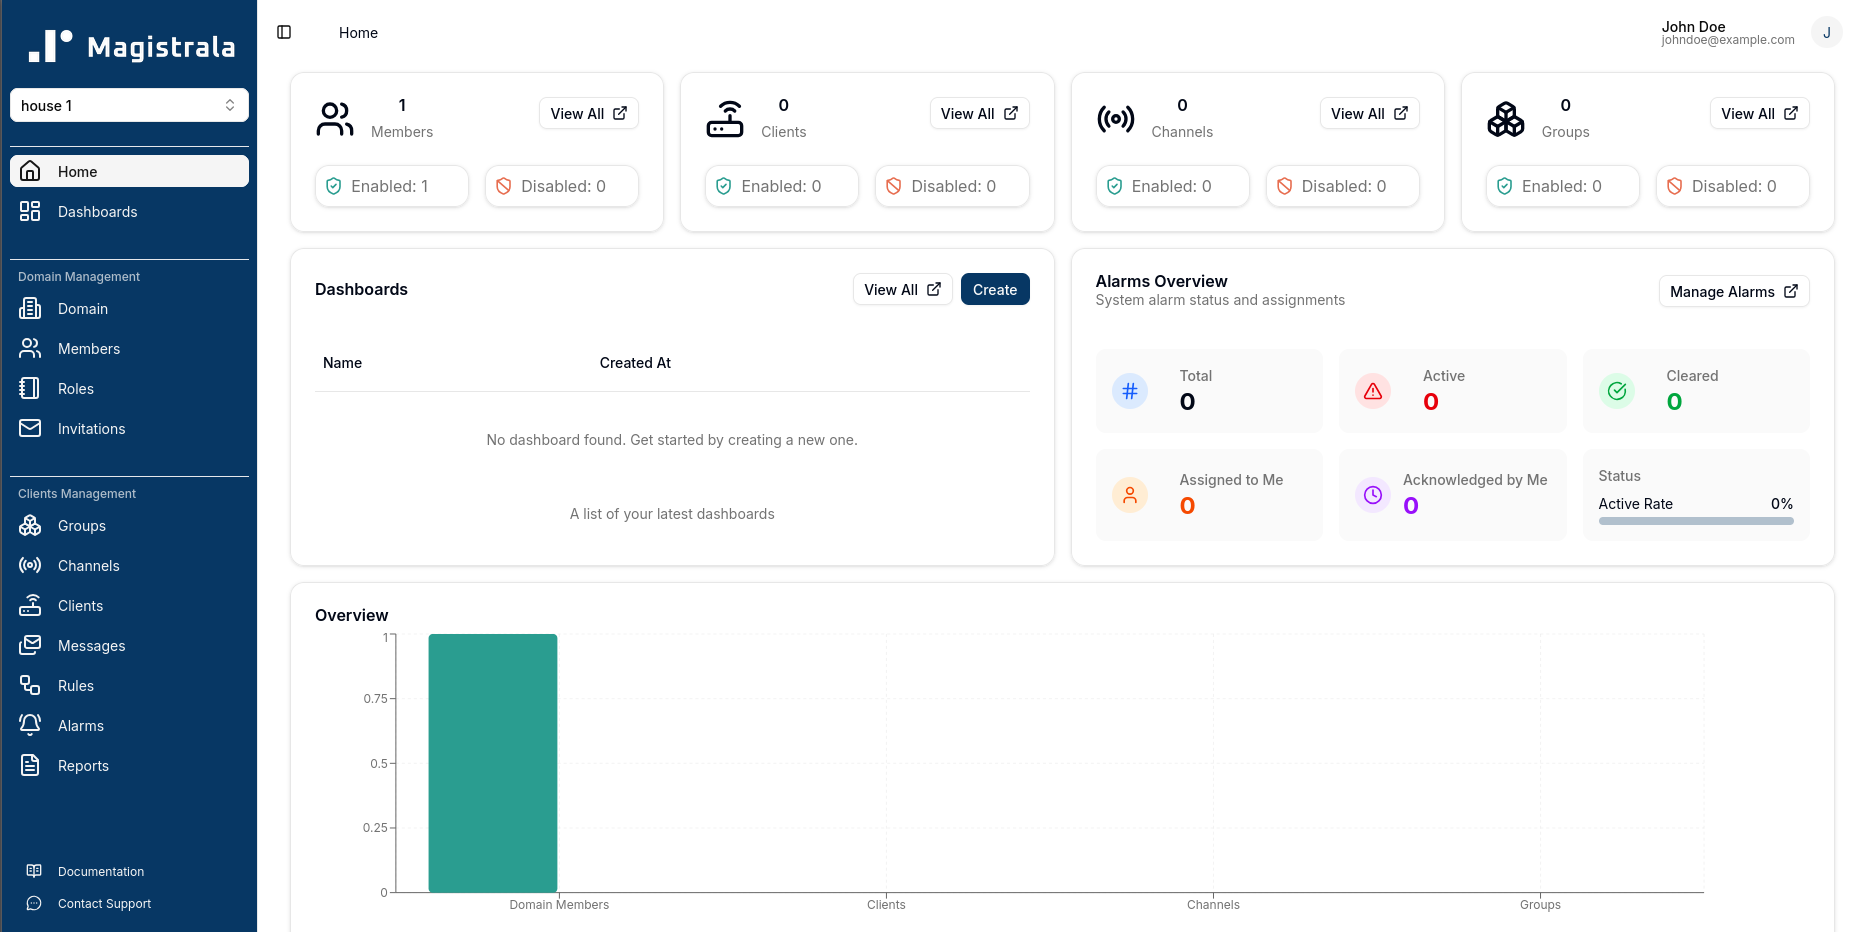
We can now click on our newly created domain to view its details.
This is where we will manage all the clients, channels, groups, and rules for this domain.
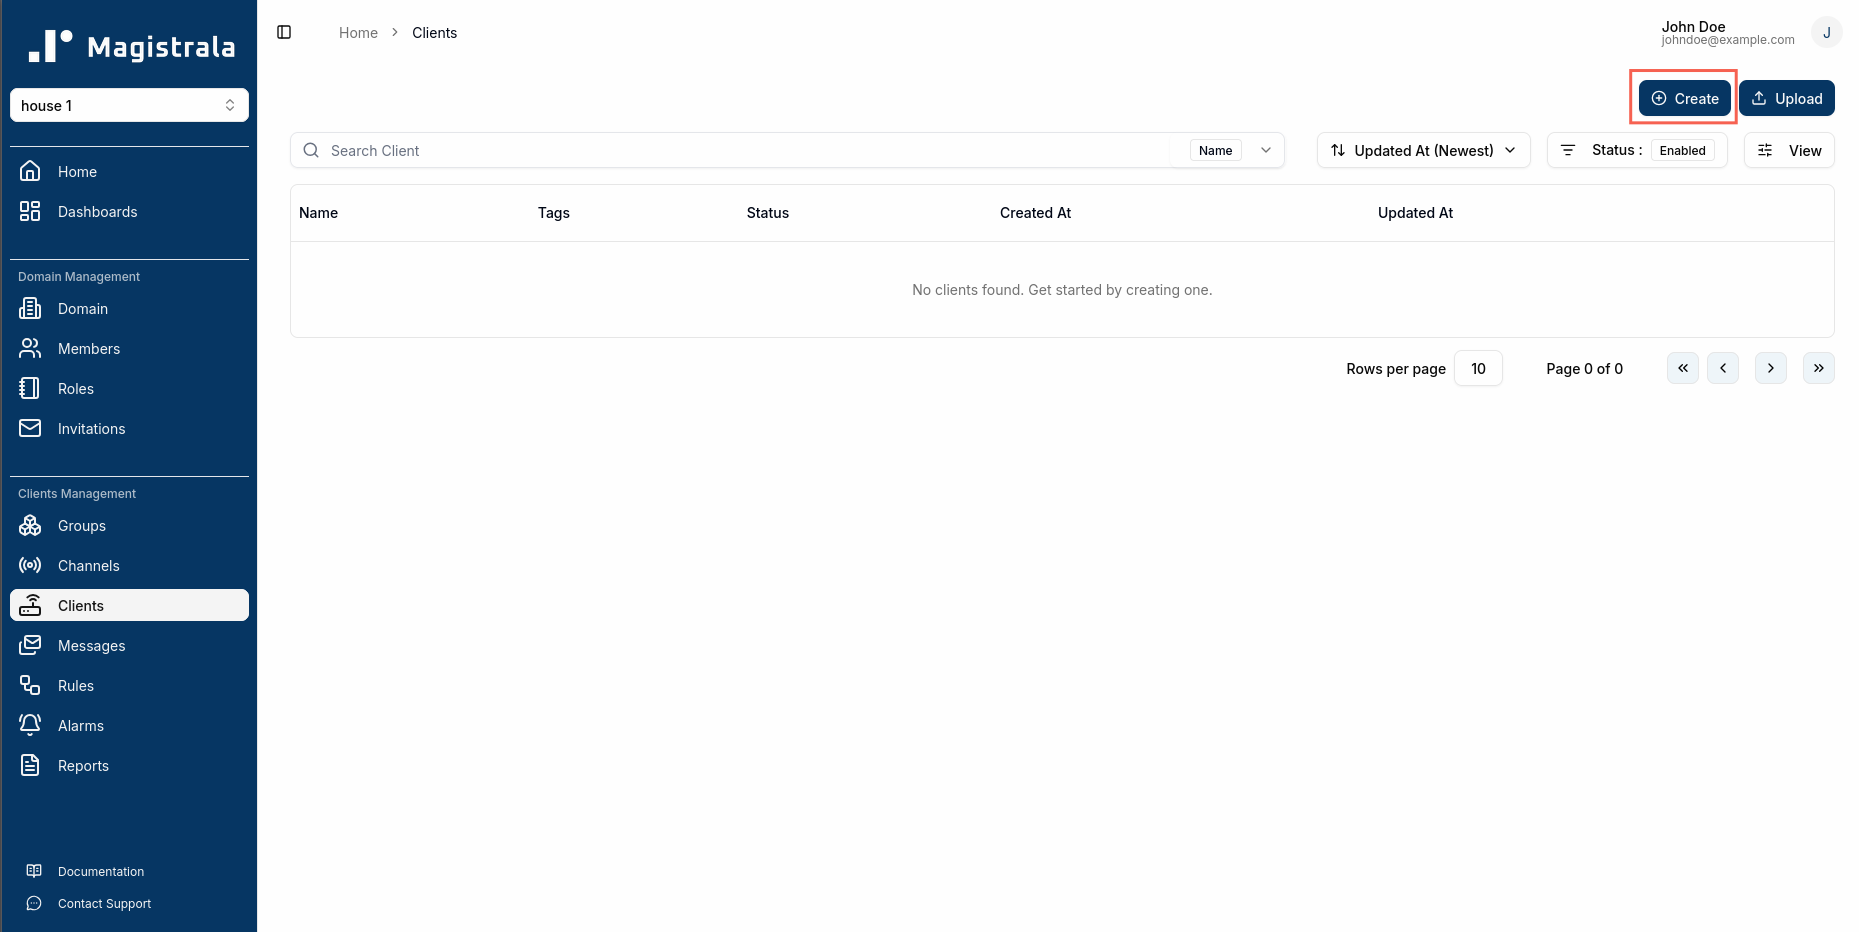
Step 2: Create a Client (Device)
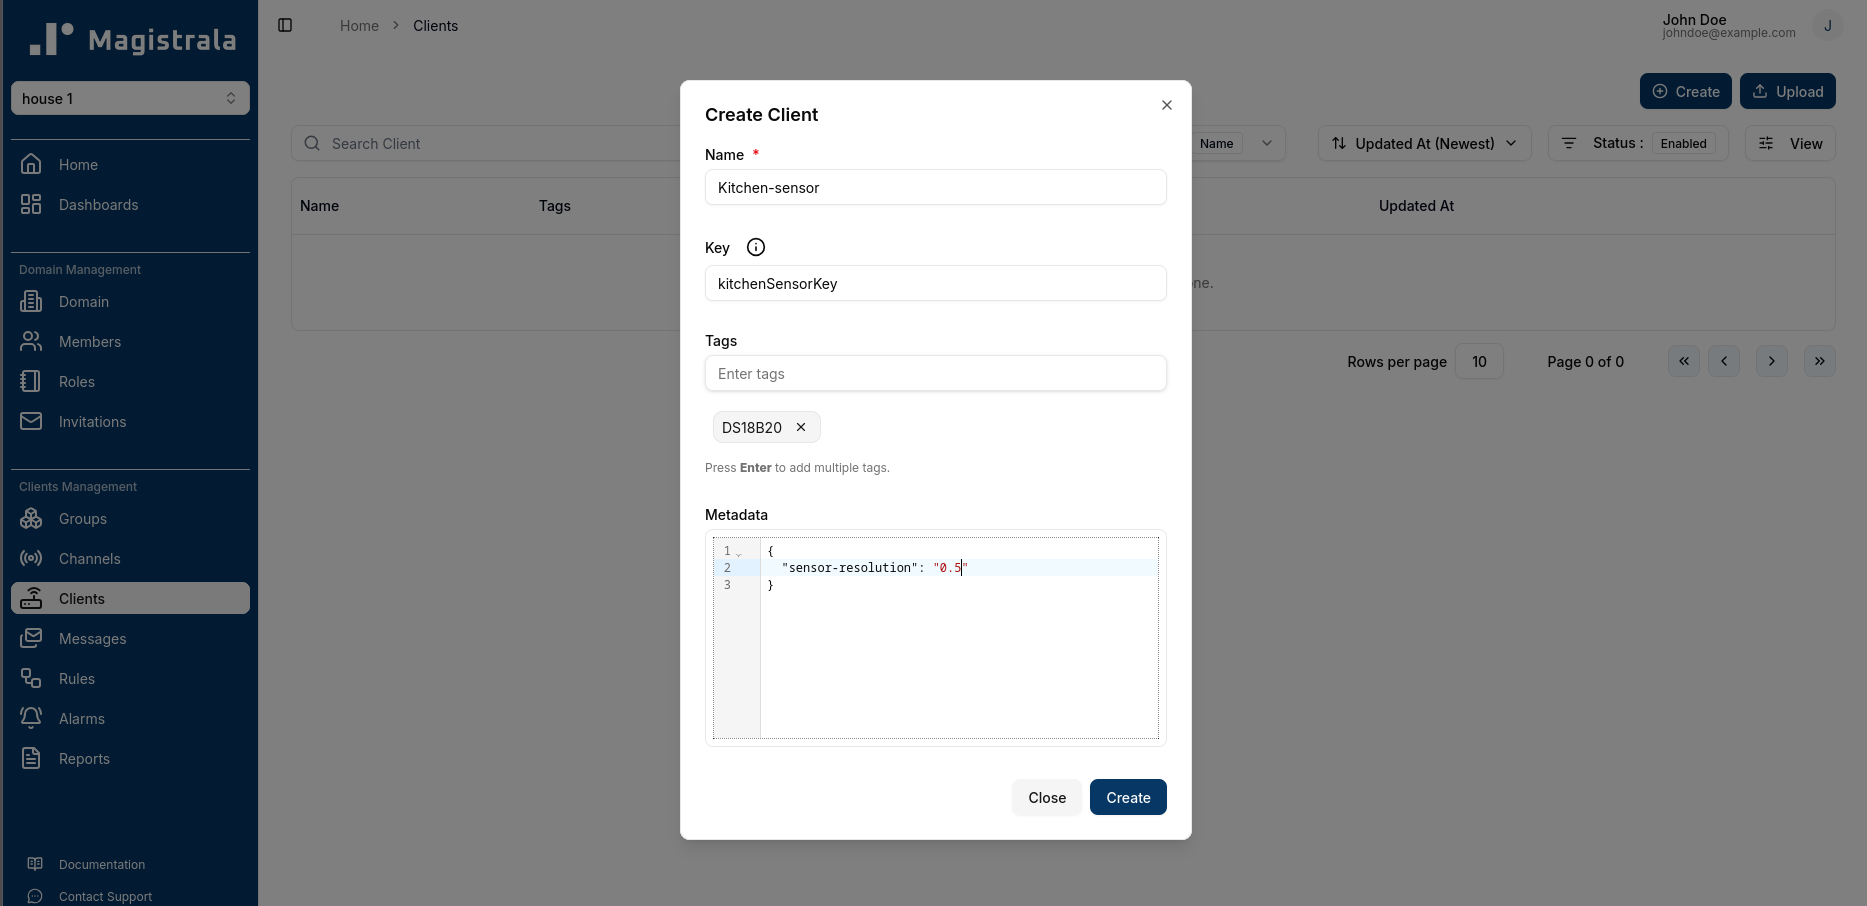
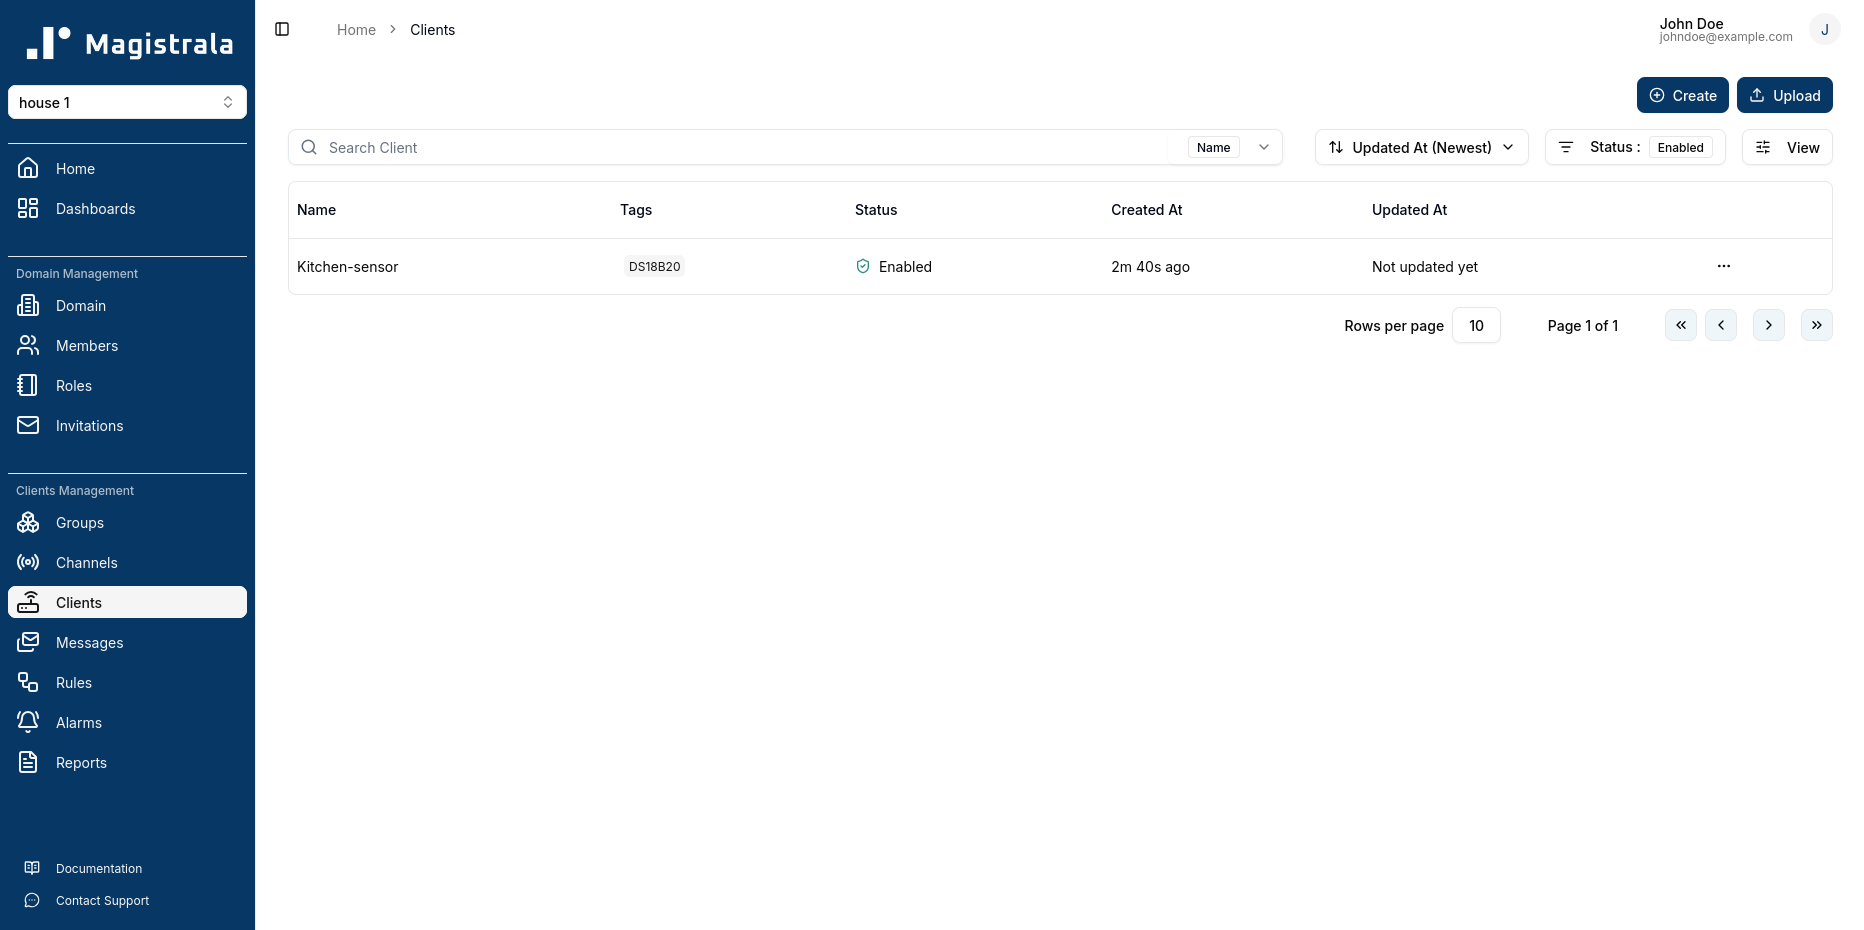
Next, we will create a client to represent our IoT device. We can do this by navigating to the “Clients” tab within our domain and clicking on the “Create” button.
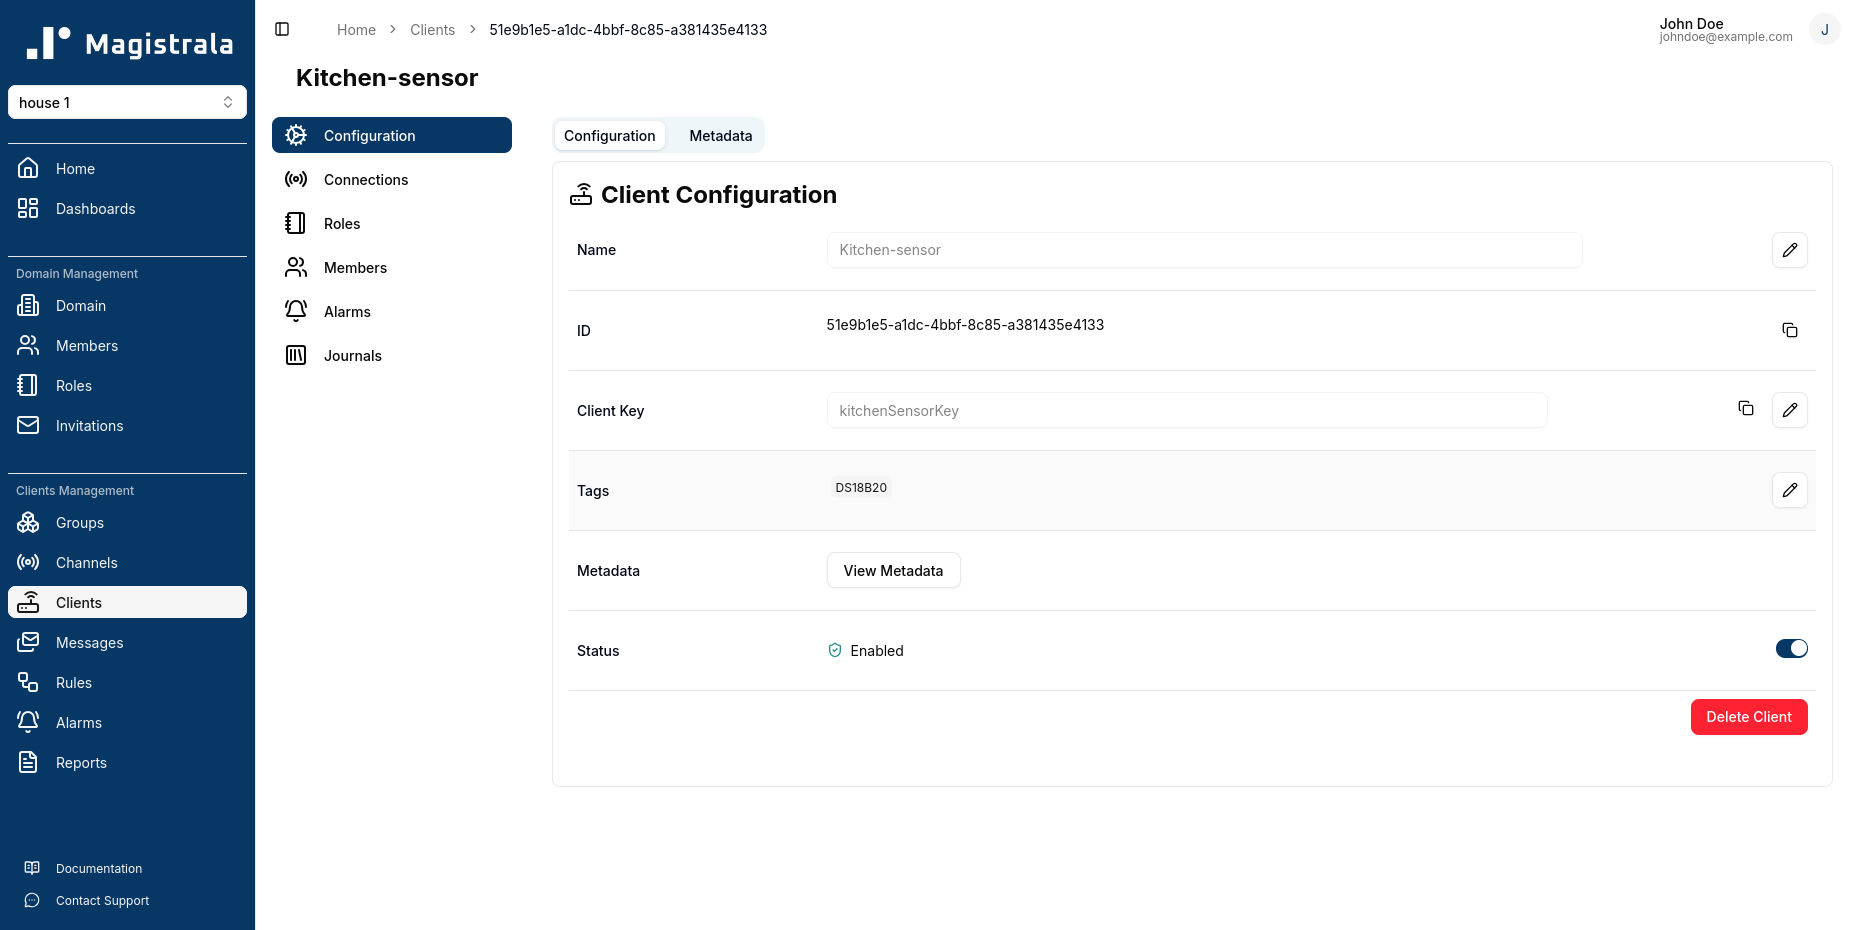
Among the fields we can provide during client creation is the client key. This is required to be a unique identifier for the client within the domain. It can be any string, but it’s common to use something that reflects the device’s identity, such as a serial number or a descriptive name. If we do not provide a client key, one will be automatically generated for us.
The client will now appear in the clients list for our domain. We can create multiple clients to represent different devices or applications that will be connecting to the platform.
After creating the client, we will be able to view its details, including its unique credentials that we will use to authenticate it when sending messages. We will require the client ID and the client secret for our device to connect to the platform.
Step 3: Set Up a Channel and Connect the Client
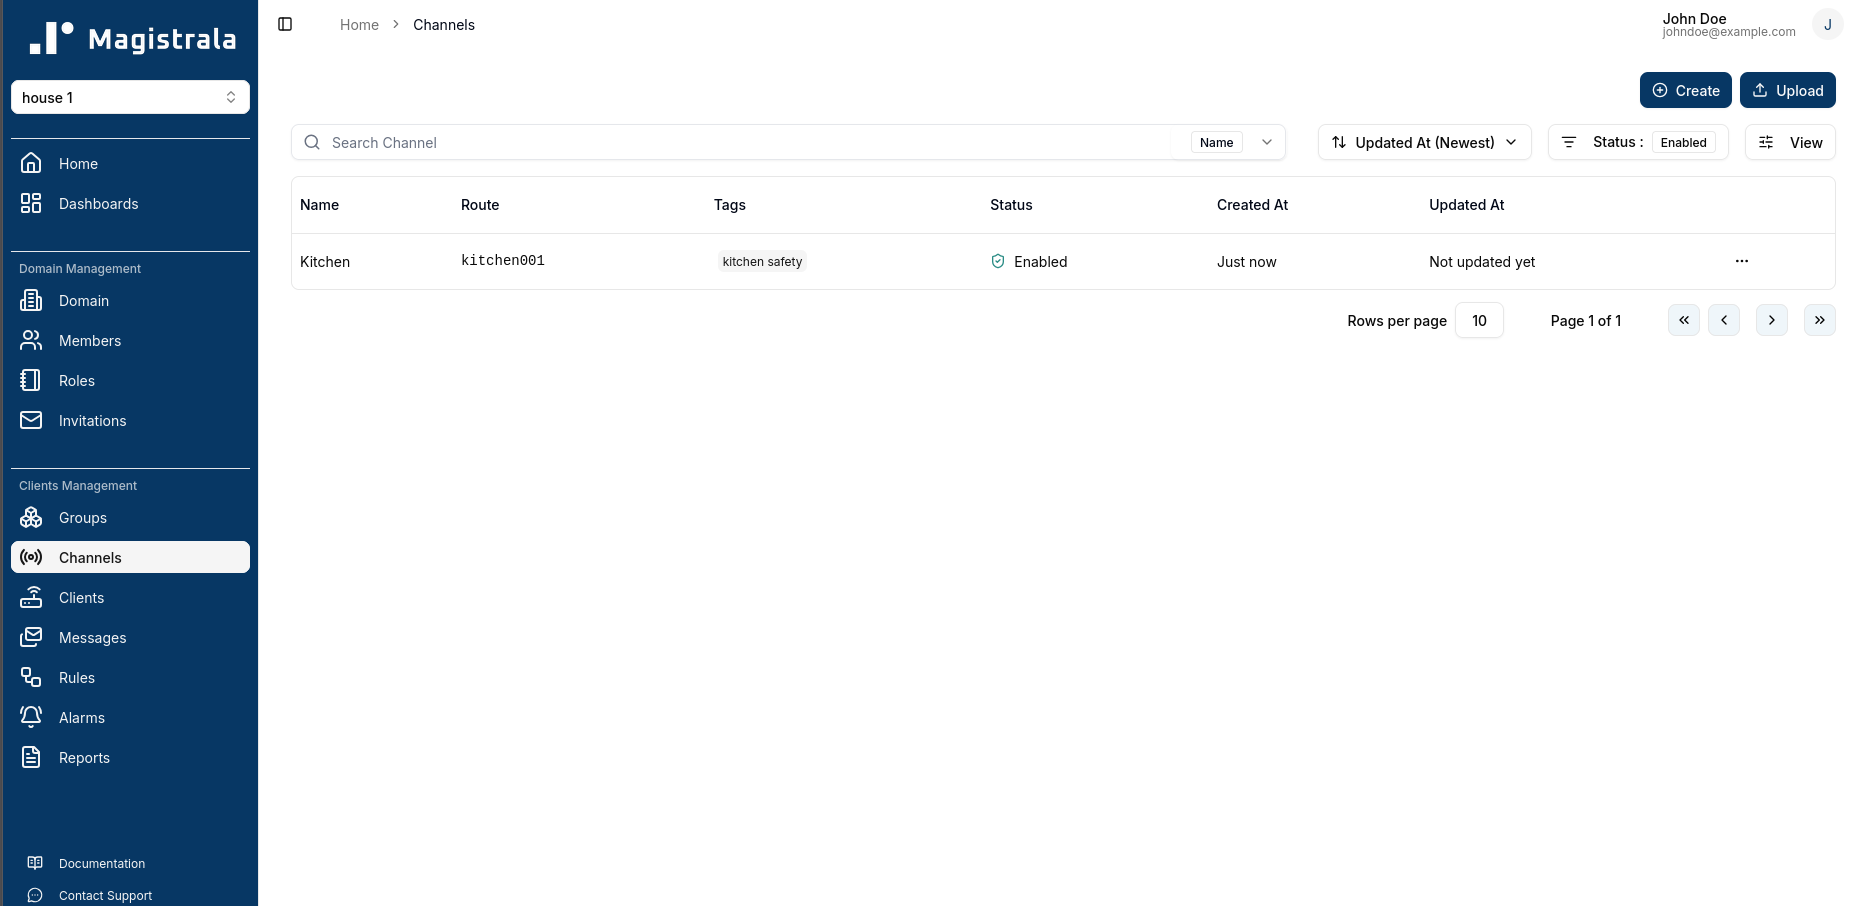
Next, we will set up a channel for our client to communicate through. Channels in Magistrala are used to control the flow of messages between clients and the platform. We can create a channel by navigating to the “Channels” tab within our domain and clicking on the “Create” button.

Similar to domains, we can provide a unique route for the channel. This route will be used by our client when sending messages to the platform.

The channels page will now list our created channel.
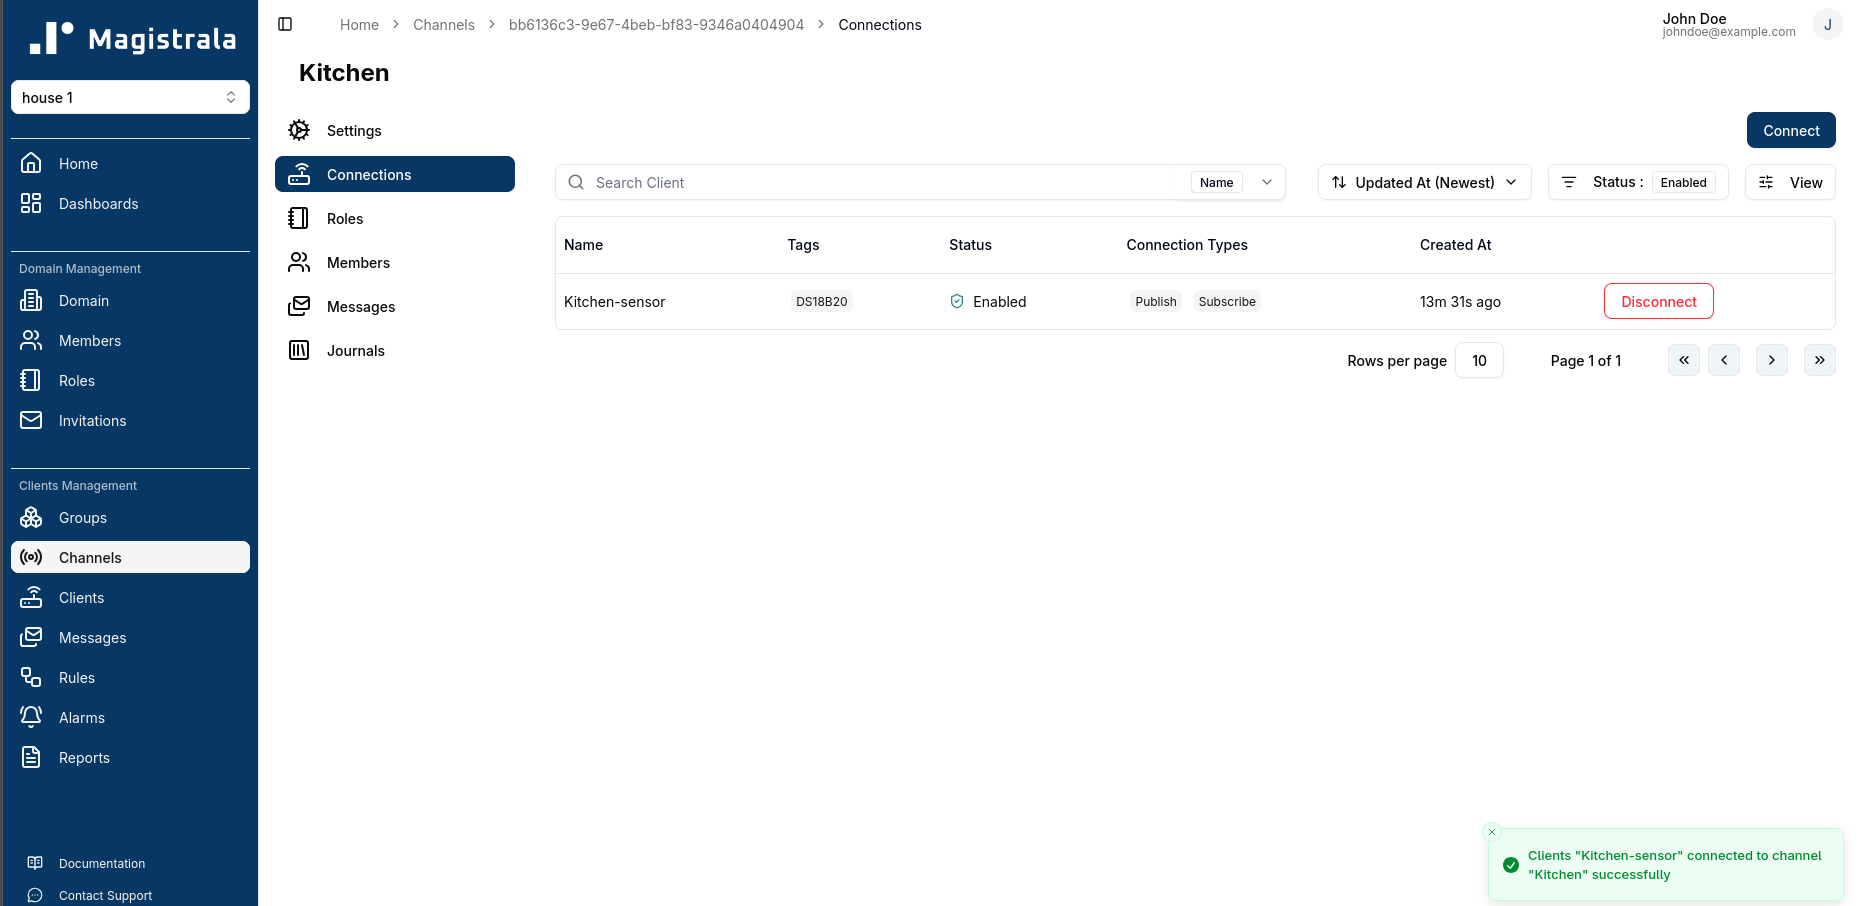
After creating the channel, we will need to connect our client to it. This can be done by clicking on the channel we just created and navigating to the Connections tab. Here we can click on the Connect button.
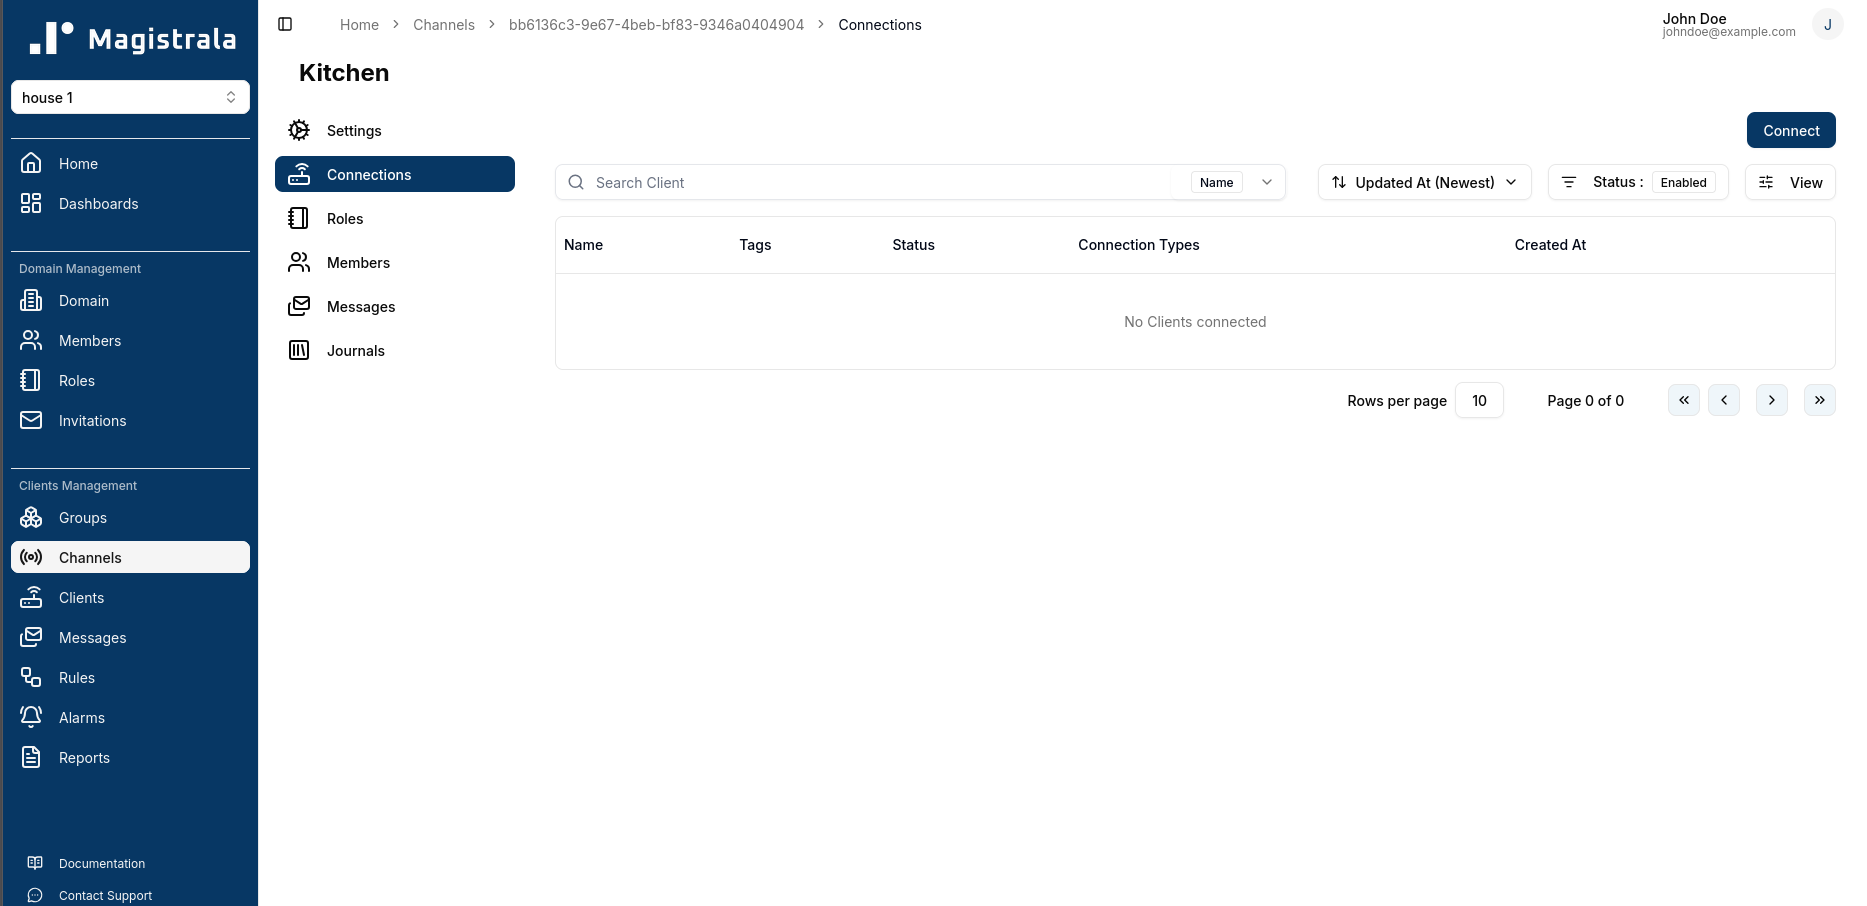
We can select our client from the list of available clients. We will enable our client to both publish and subscribe to messages on this channel.

Once successfully connected, we will see our client listed under the channel connections.
Step 4: Create a Rule to Store Data
Next, we will create a rule to store the data sent by our device into the internal database. Rules in Magistrala allow us to define custom actions on the messages sent to the platform. We can create a rule by navigating to the “Rules” tab within our domain and clicking on the “Create” button.
Building the Rule
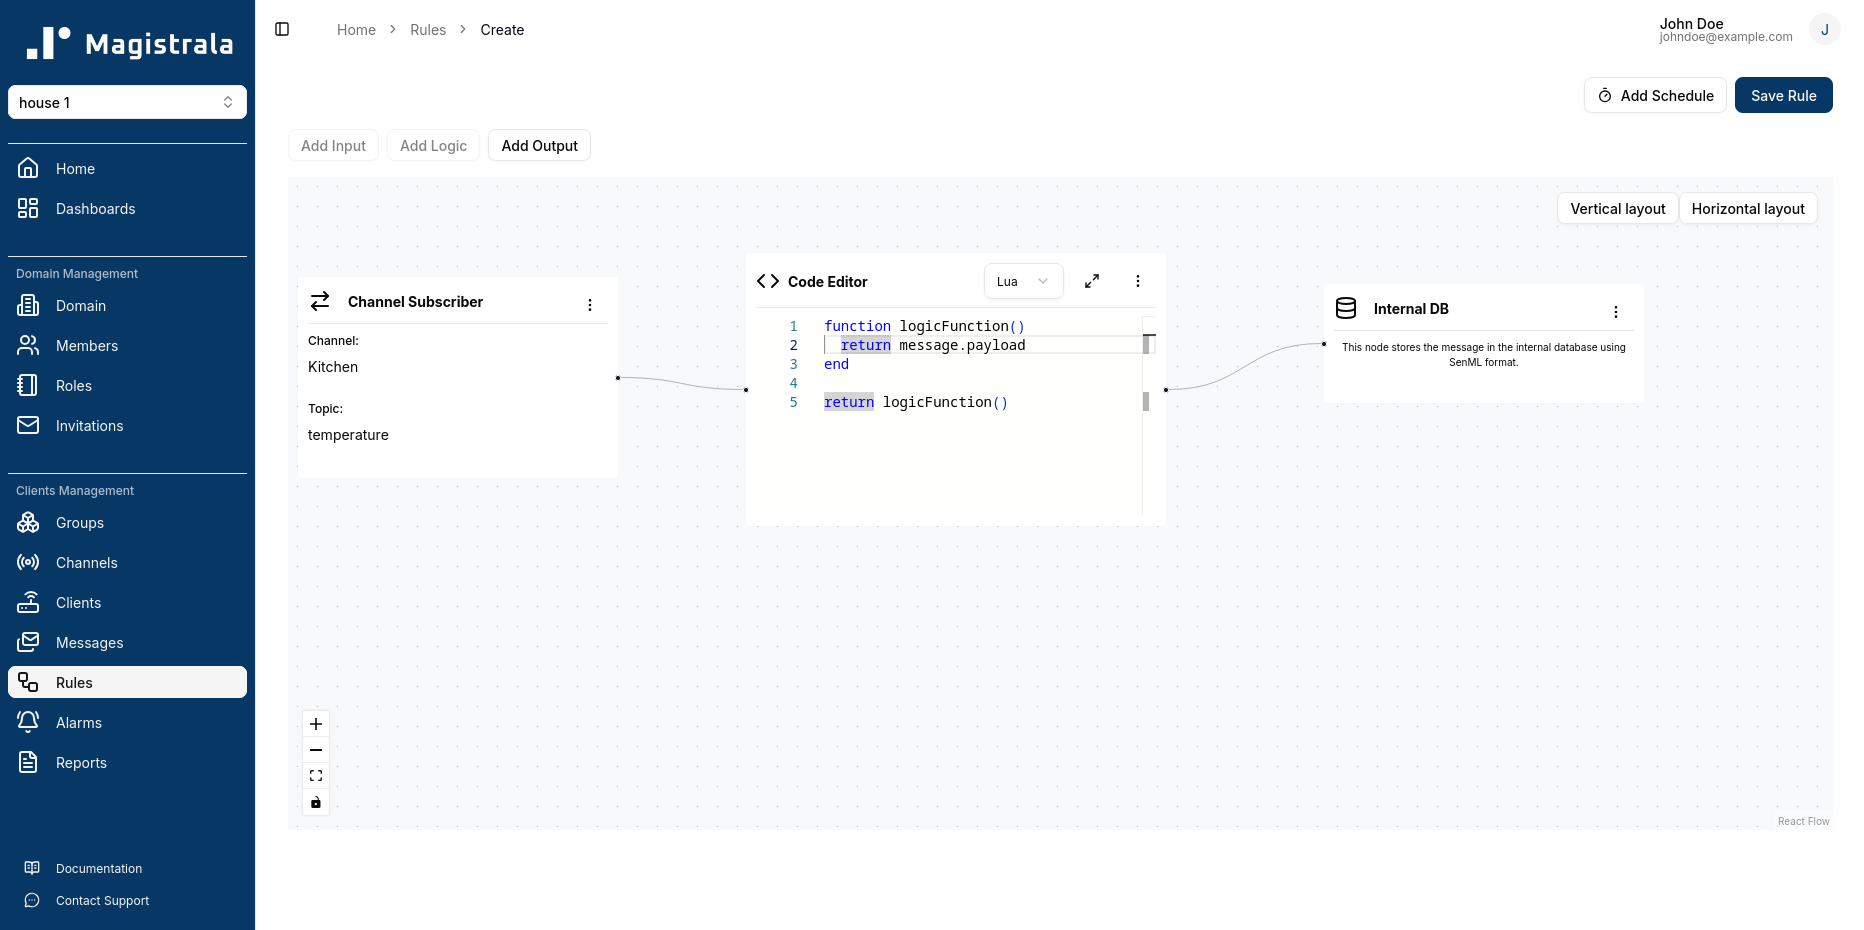
- We will add an Input Node to subscribe to the channel we created earlier. This will allow us to receive messages sent by our device to that channel.
- We will add a Logic Node to process the incoming messages. In this case, we will use a Lua Script Editor to define a simple logic function that returns the payload of the incoming messages.
- Finally, we will add an Output Node to store the processed messages in the Magistrala internal database. This will allow us to later visualize the data on a dashboard.
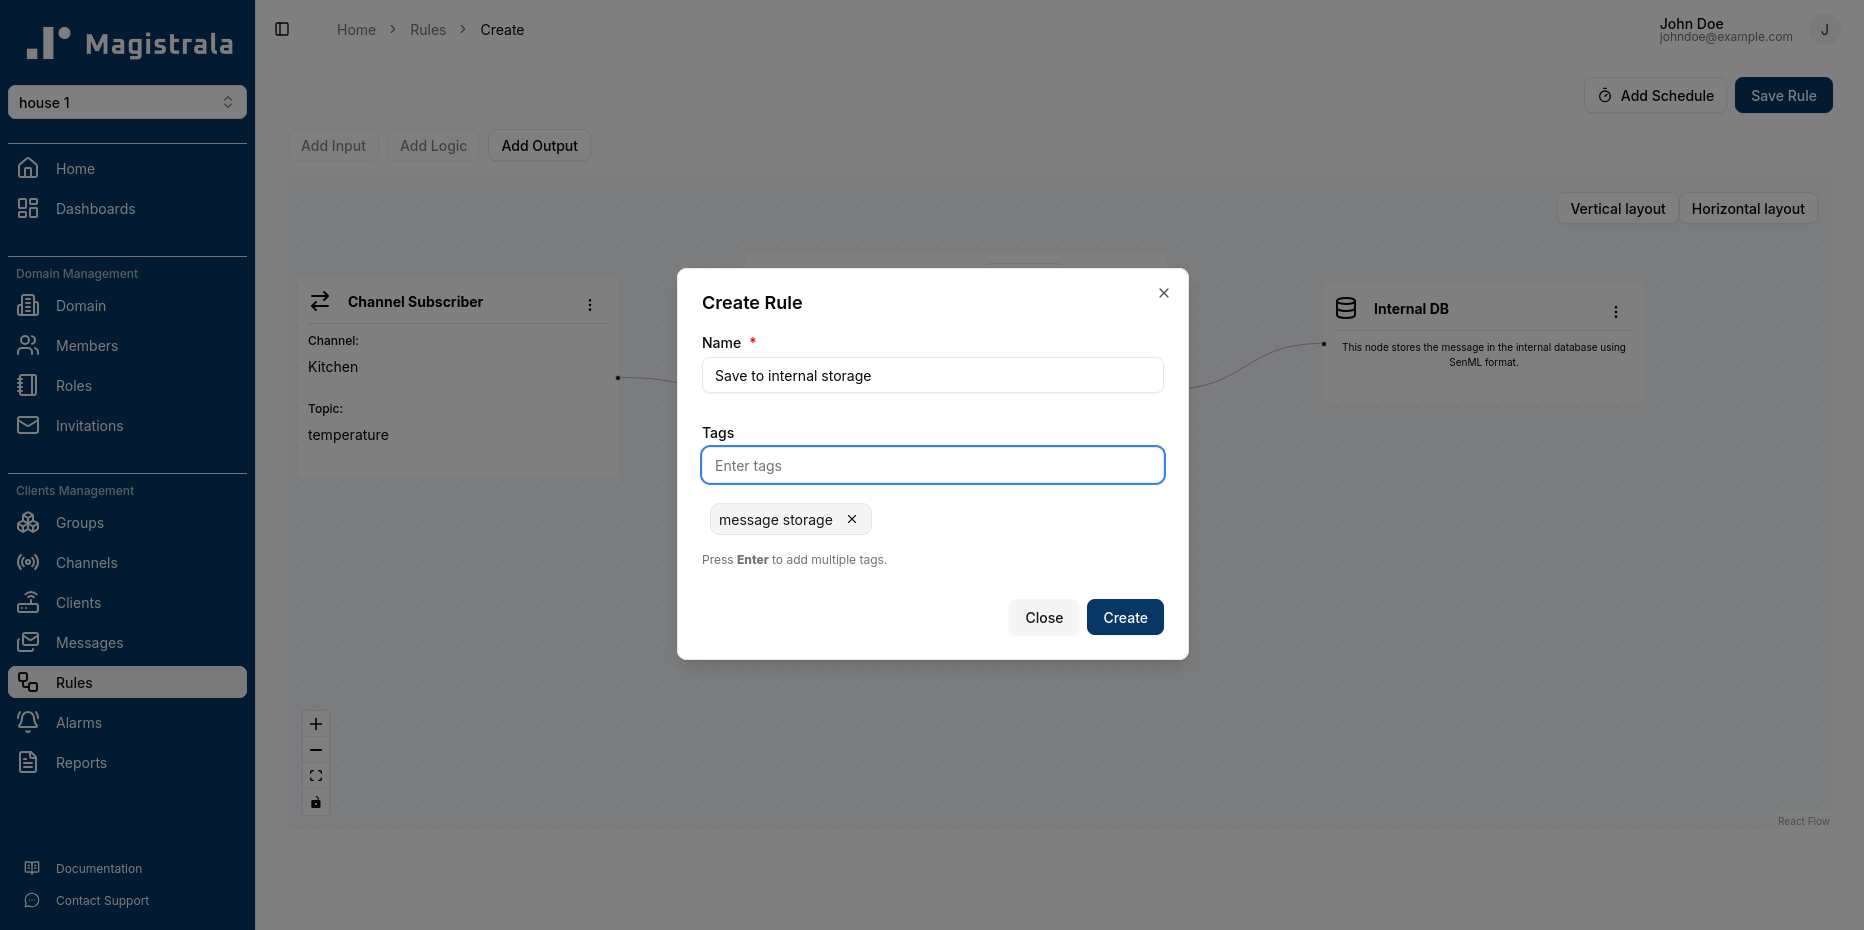
We can then save the rule with a name and optional tags for easier organization.
Once the rule is saved, it will be active and will process any messages sent by our device to the channel according to the defined logic.
Step 5: Simulate Device Sending Temperature Data
To simulate our device sending temperature data, we can use the HTTP protocol via a curl command. We will send a POST request to the Magistrala messaging endpoint to publish messages to the channel. The request will include the client credentials for authentication, the channel ID, and the message payload containing the temperature data.
The data we send should be in the SenML format, which is a common format for representing sensor data. An example payload might look like this:
{
  "bt": 1638316800,
  "e": [
    {
      "n": "temperature",
      "v": 22.5
    }
  ]
}
curl -s -S -i -X POST \
http://localhost:8008/m/<domain_id>/c/<channel_id>/temperature \
-H "Content-Type: application/json" \
-u "{client_id}:{client_secret}" \
-d '{
"bt": 1638316800,
"e": [
{
"n": "temperature",
"v": 22.5
}
]
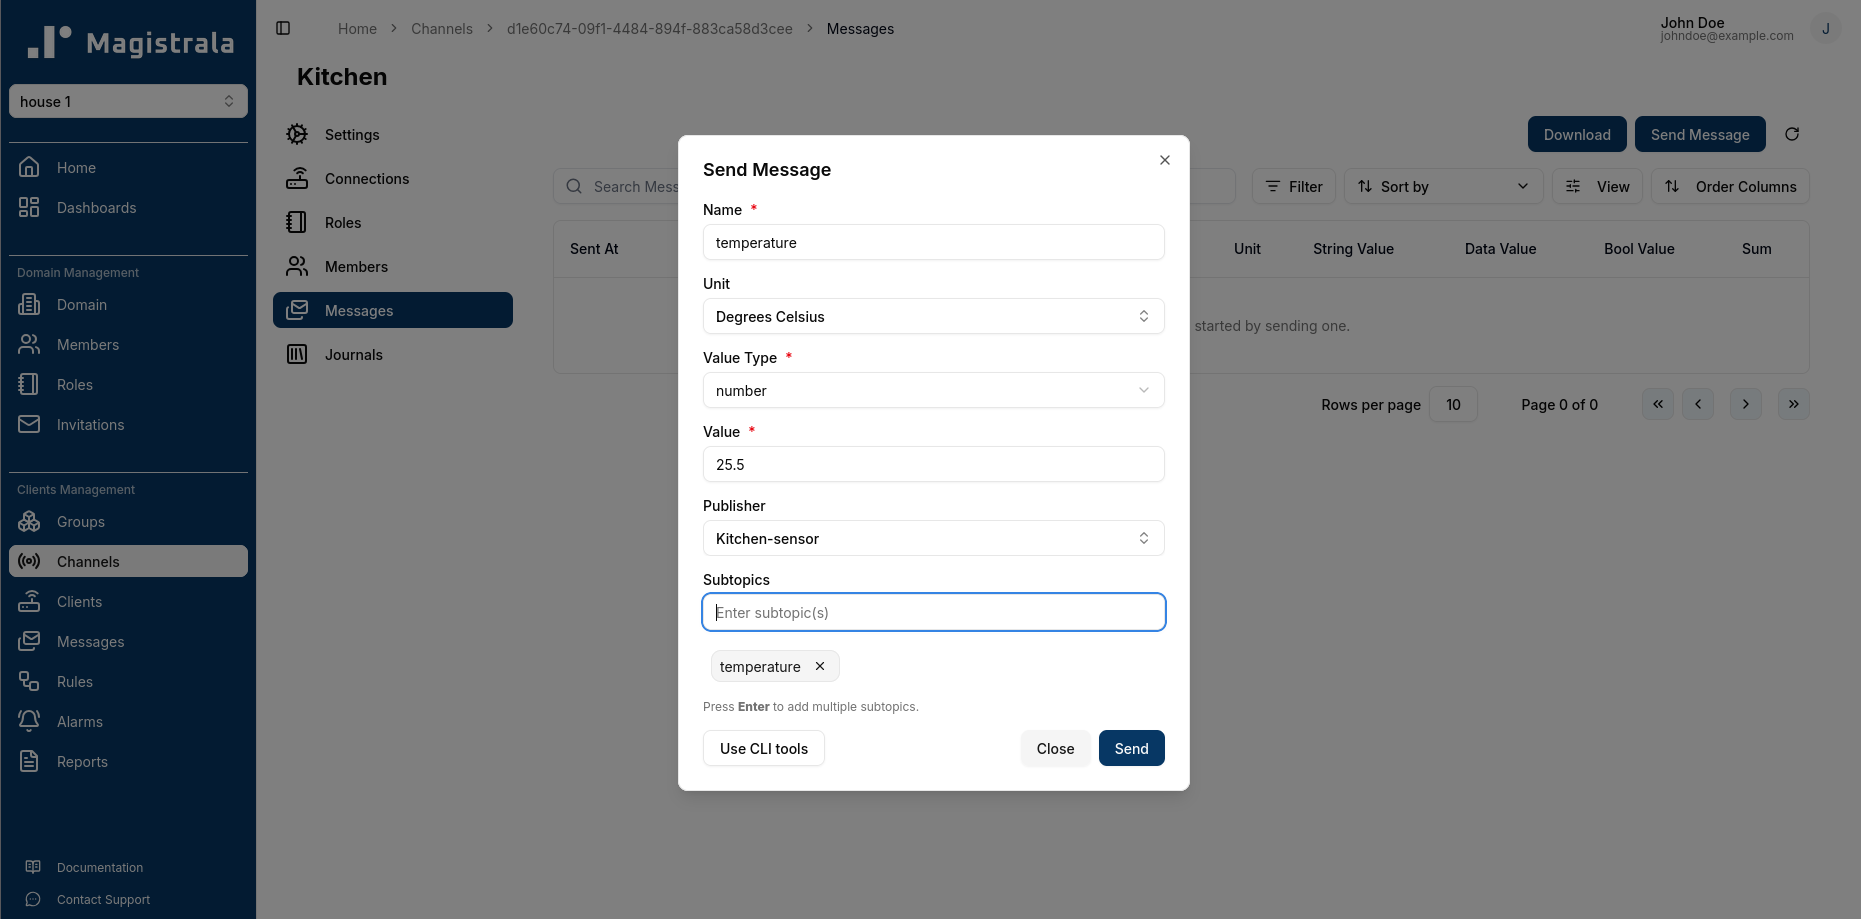
}'This can also be done using the UI by navigating to the Messages tab of the channel and clicking on the Send Message button.
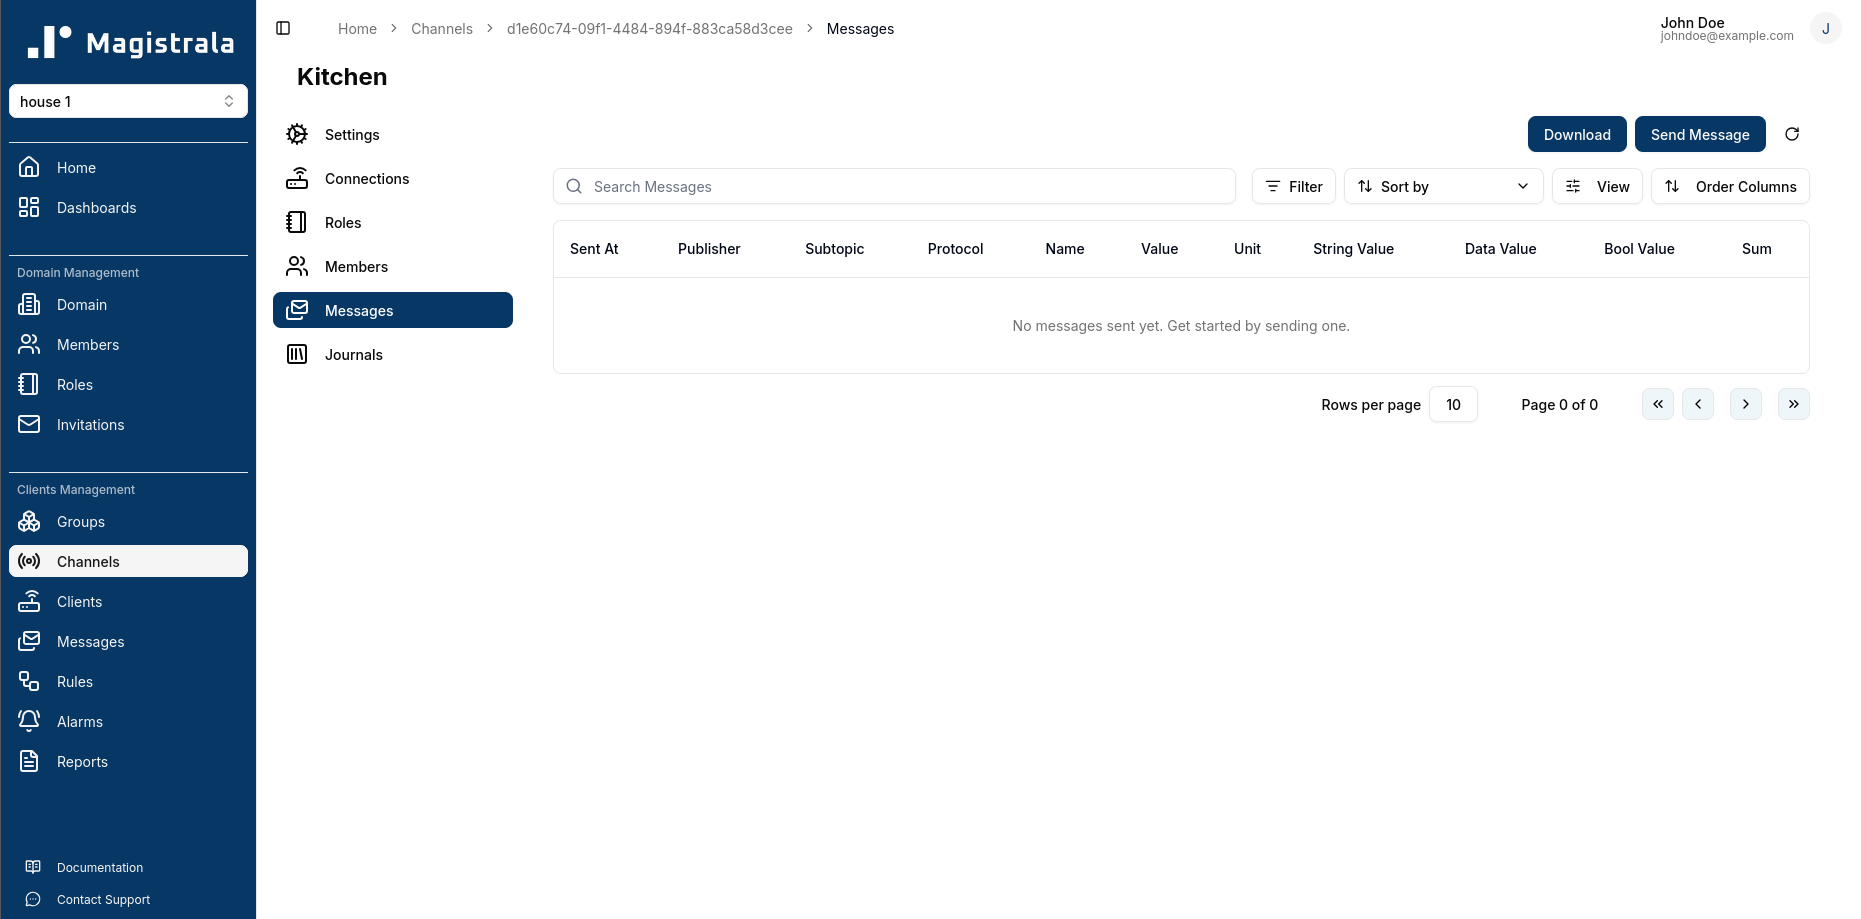
This will open a dialog box where all required fields are marked with an asterisk. Messages are sent via the HTTP protocol in the UI.
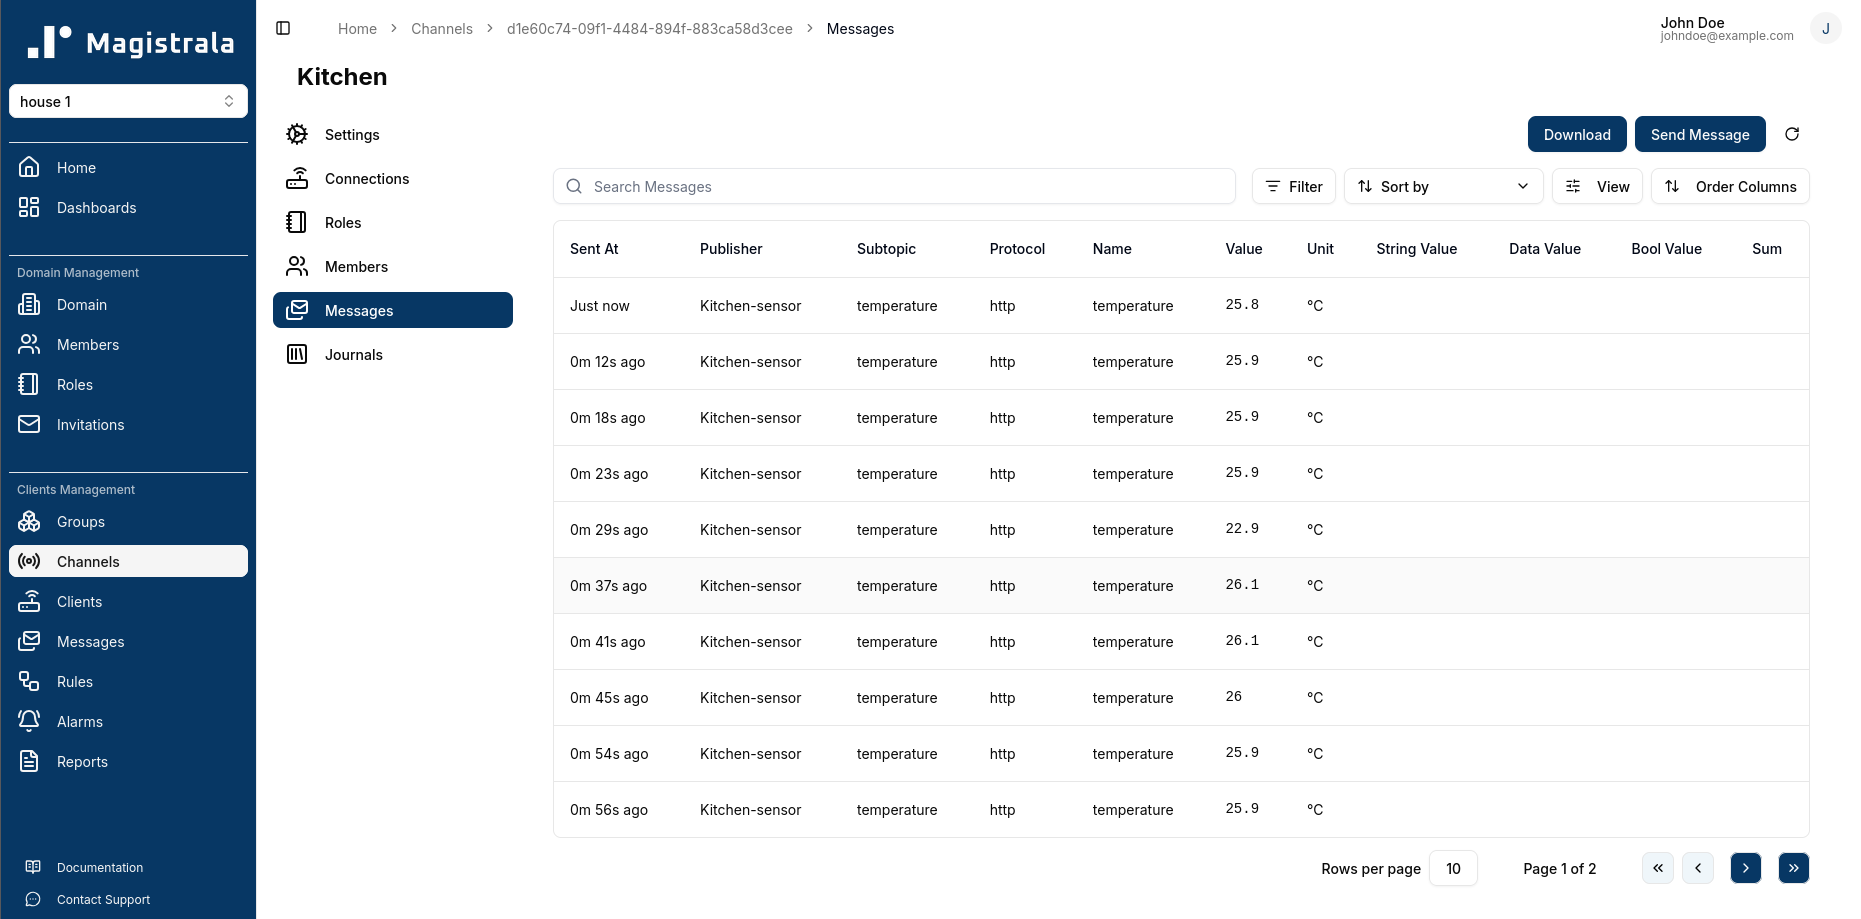
The messages table will then update to include the messages sent, with the latest message appearing first. Using the filter options, you can filter through a wide range of messages based on the protocol, publisher, or even value.
Step 6: Visualize Data on a Dashboard
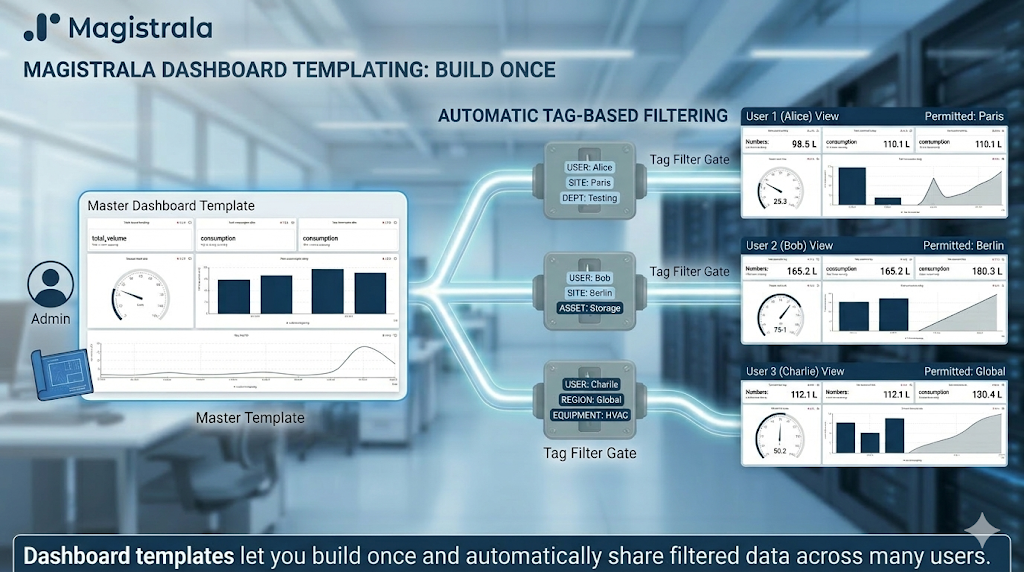
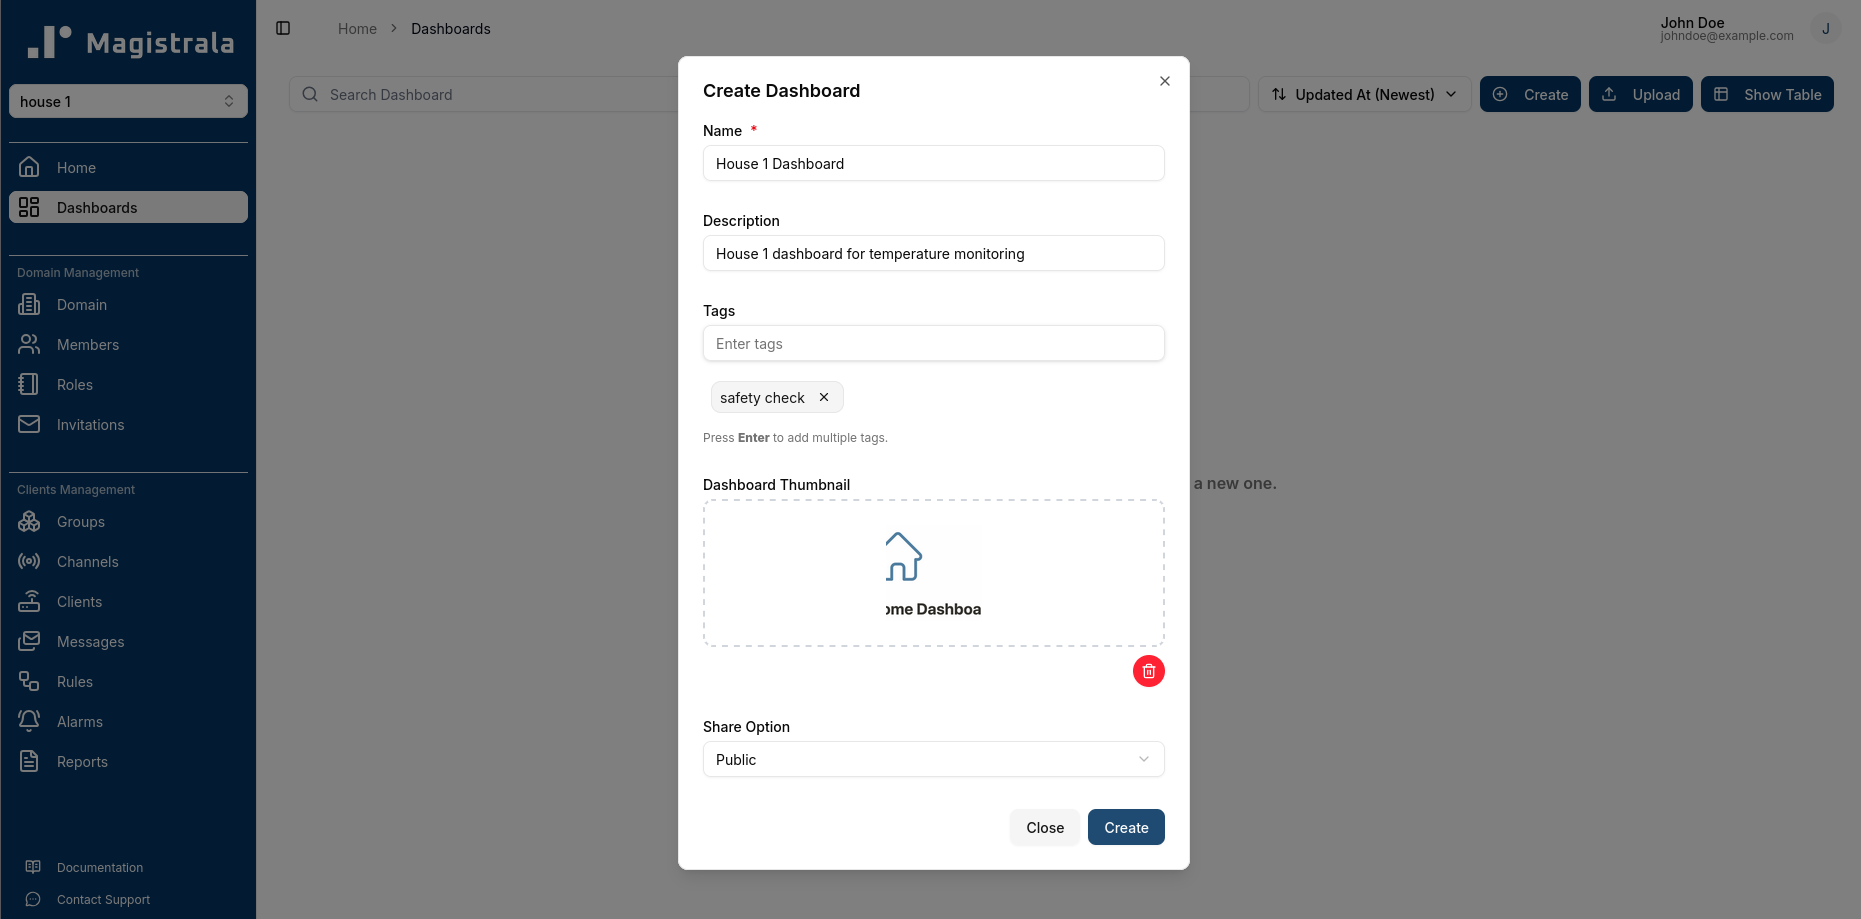
To visualize the temperature data sent by our device, we can create a dashboard in Magistrala. Dashboards allow us to create visual representations of our data using various widgets such as charts, gauges, and tables. More information on dashboards can be found in the Magistrala docs user guide on dashboards. We can create a dashboard by navigating to the “Dashboards” tab within our domain and clicking on the “Create” button.
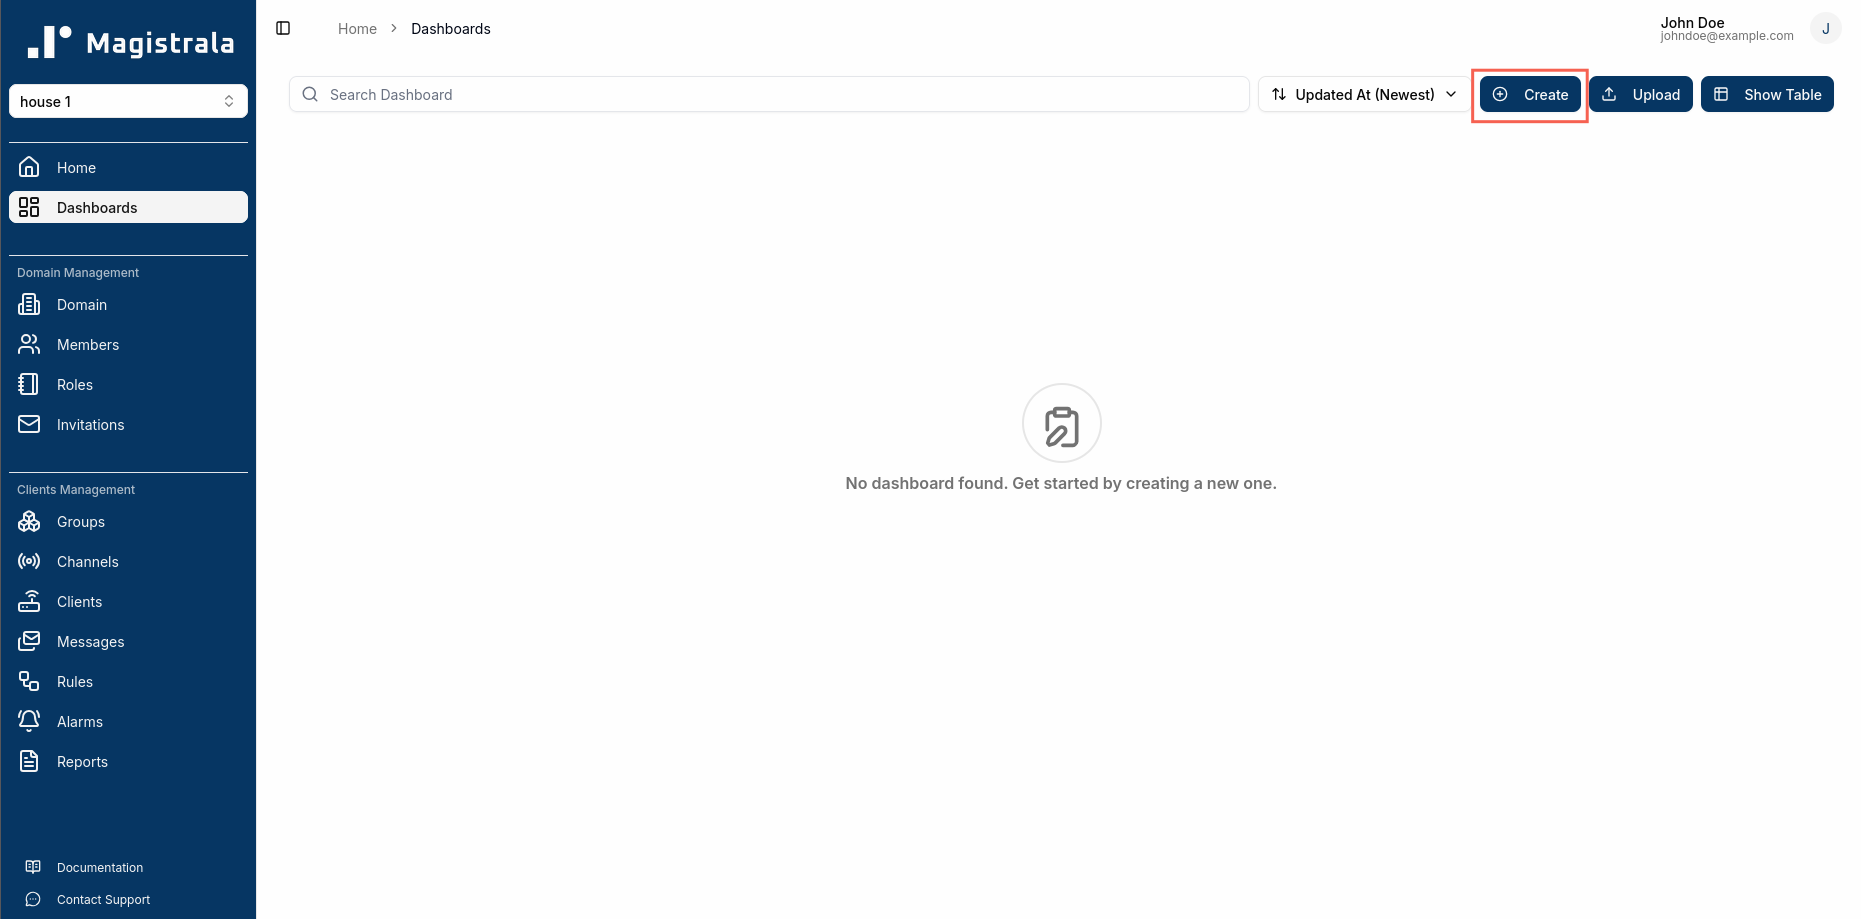
The required fields are highlighted with an asterisk. We will provide a name for our dashboard and optionally a description and tags for easier organization.
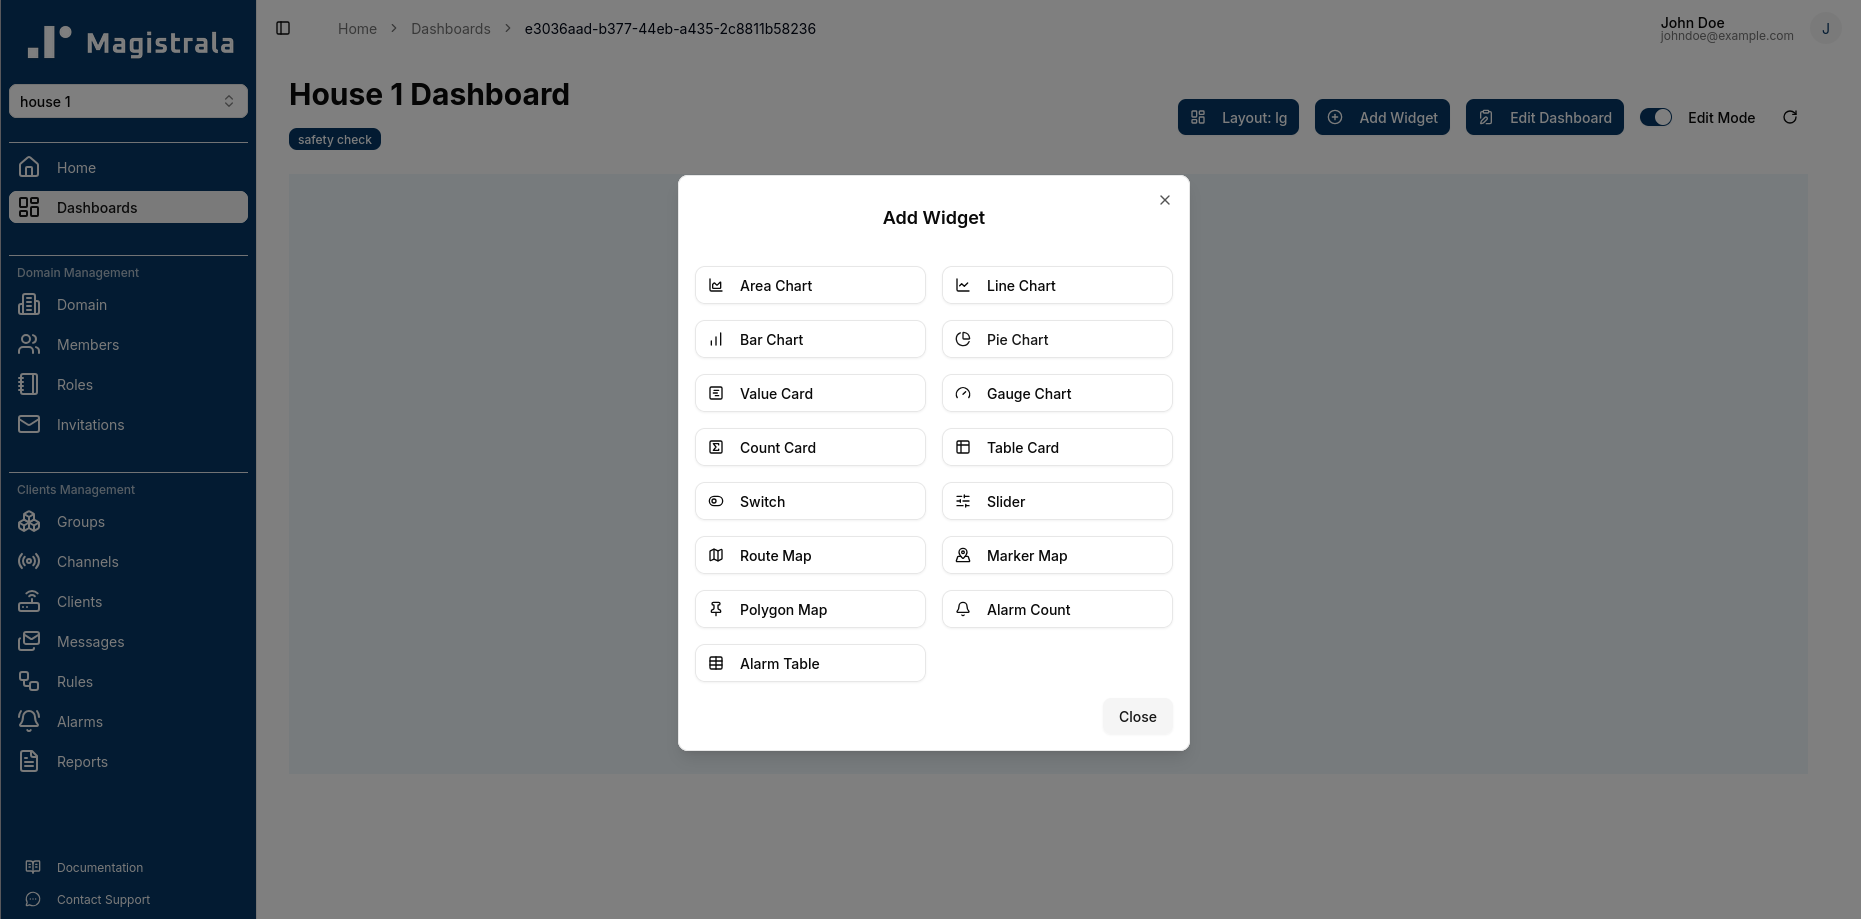
We can then click on our newly created dashboard to add widgets. For visualizing our temperature data, we can add a line chart widget that displays the temperature values over time.
To create the widget, click on Edit Mode and then click Add Widget. We will select the Line Chart widget and configure it to display the temperature data from our channel. We will select the channel we created earlier as the data source and specify the appropriate fields for the x-axis (time) and y-axis (temperature).
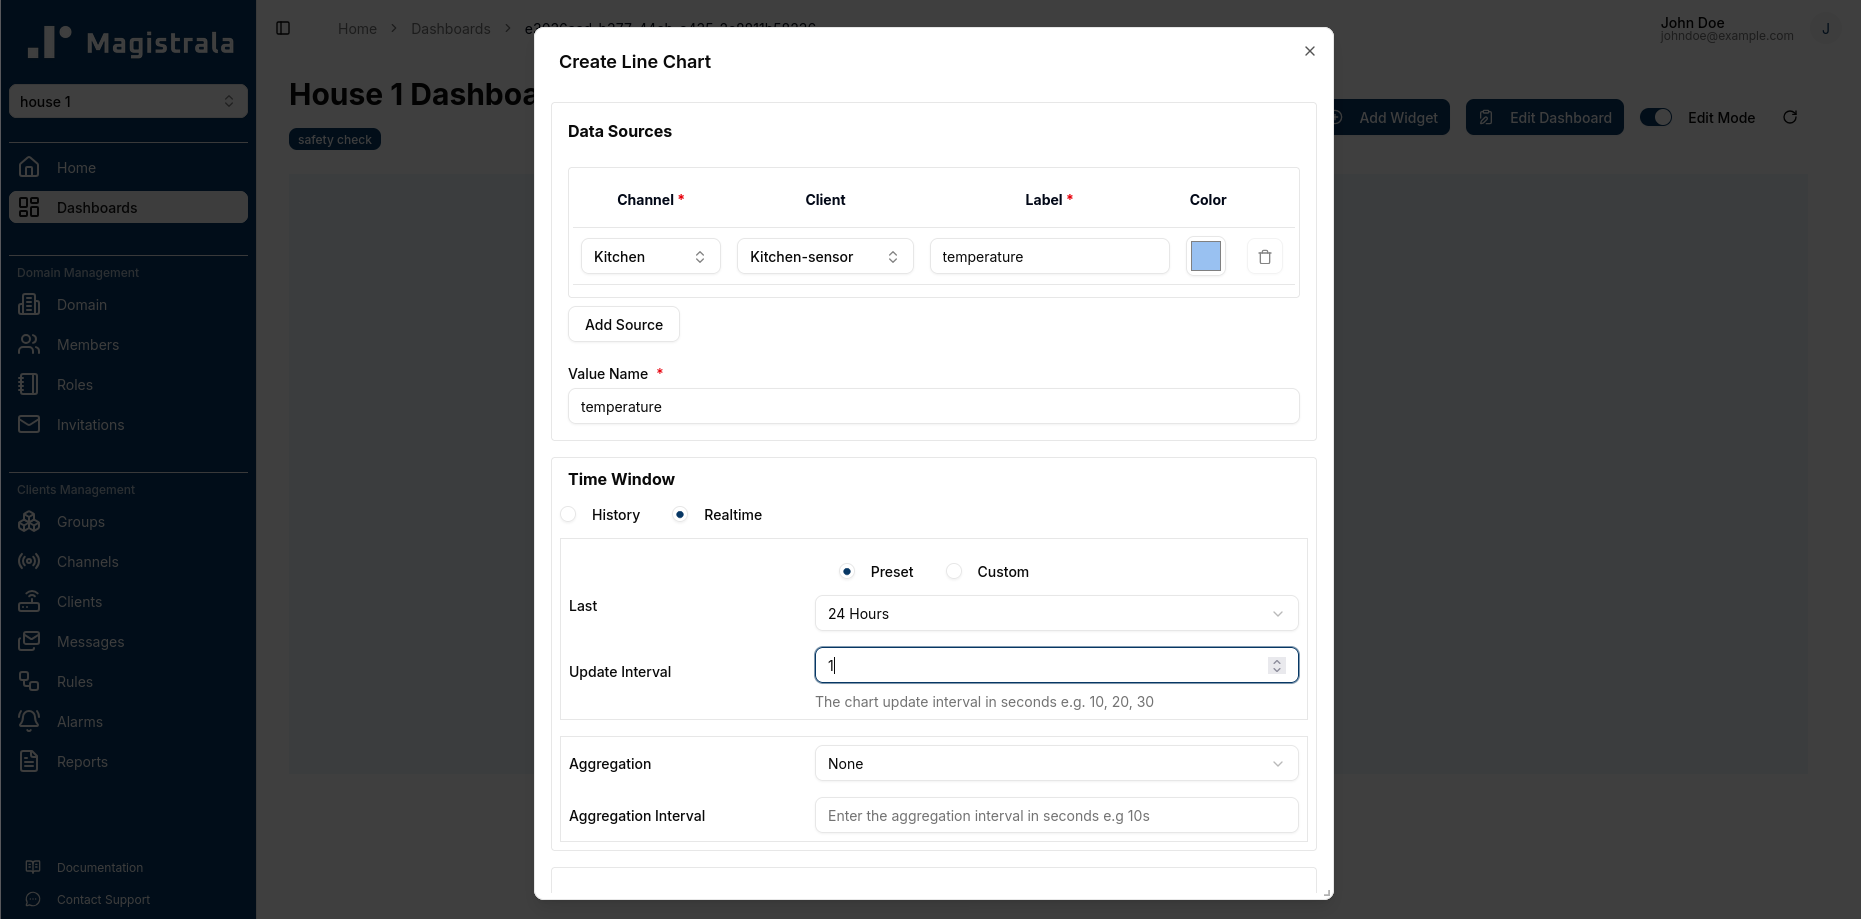
We have to specify the name of the data value. The combination of the
nandbnfields in the SenML payload will be used to identify the data value. In our example, thenfield is “temperature” and there is nobnfield. Therefore, the name of our data value will be “temperature”.
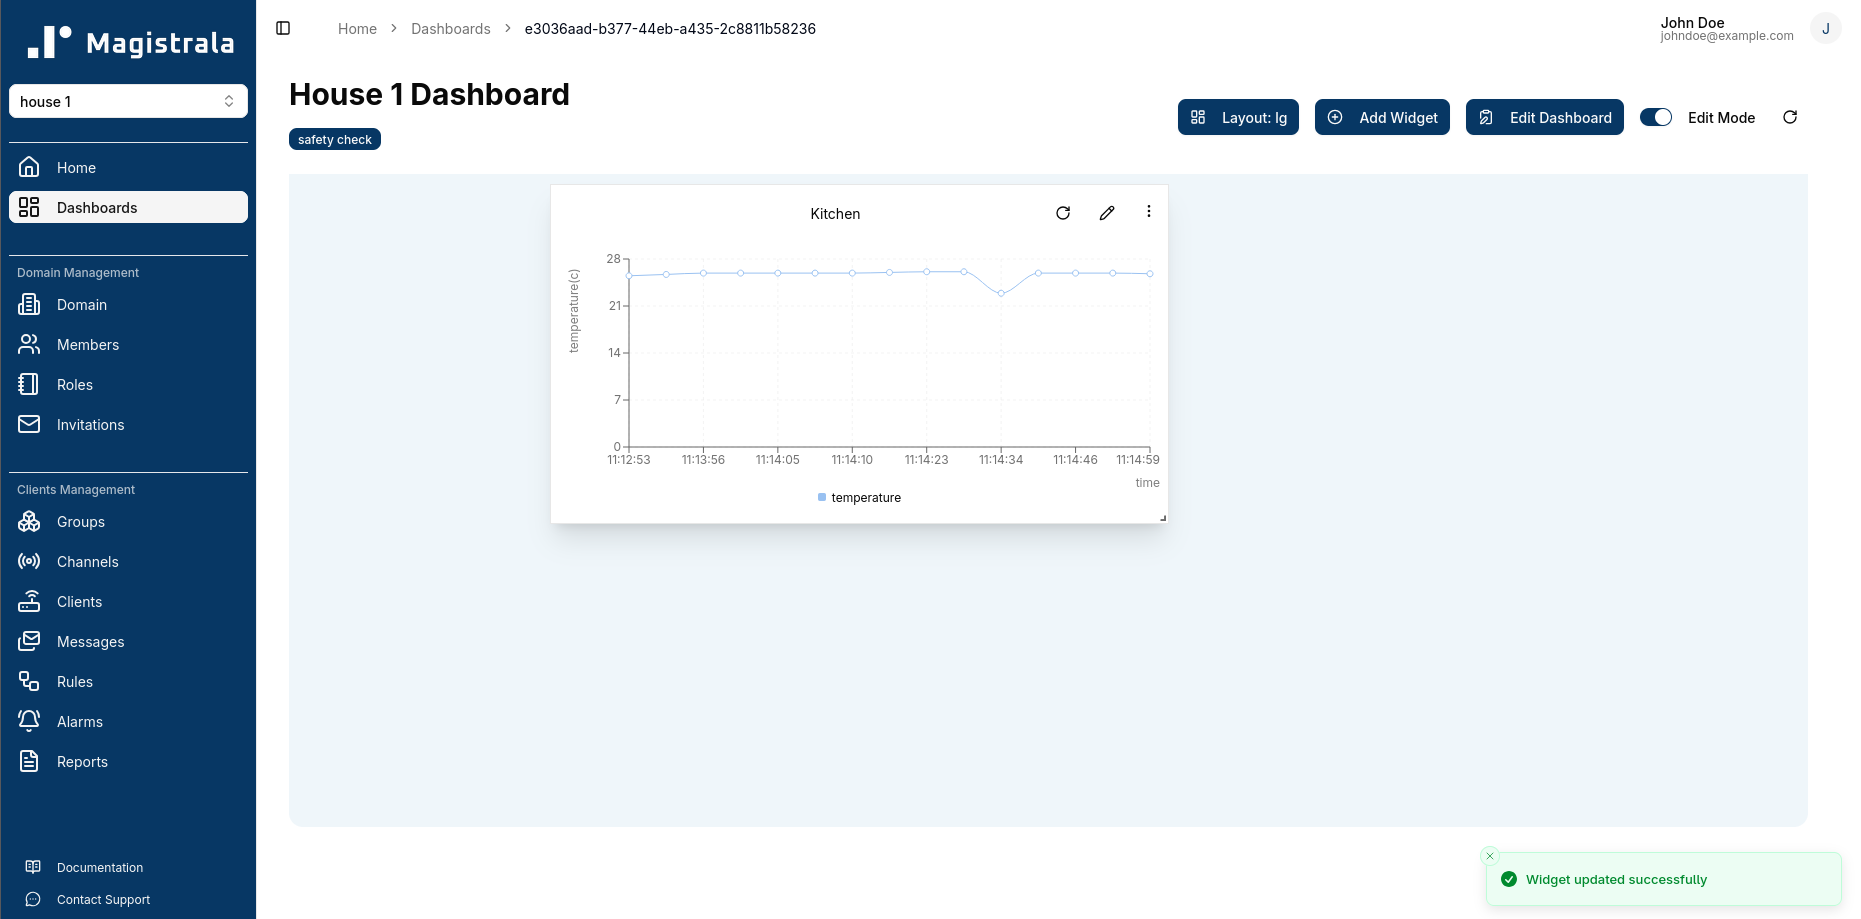
After configuring the widget, we can save it and view our dashboard. As we send more temperature data from our device, the line chart will update in real-time to reflect the new data points.
Conclusion
In this guide, we covered how to set up a local Magistrala instance, create a simple IoT flow, and visualize data in real-time. The main point, though, is what you didn’t have to create: an authentication service, a multi-tenant access control layer, protocol translation, a rules engine, or a dashboard framework. All of that is included.
For teams looking at IoT platforms, this means you can bring products to market faster. You can lower engineering costs, and reduce long-term maintenance. You won’t lose control over your infrastructure or data. Magistrala’s microservices architecture allows you to start with a single Docker Compose deployment today and scale individual services independently as your device fleet grows. Whether you are a startup creating your first connected product or a large company updating your old device infrastructure, Magistrala offers a ready-to-use foundation. All this without the effort of piecing together a platform from separate components.
Whether you choose to run Magistrala locally or use our hosted cloud version, you can get started with confidence knowing that the platform is designed for real-world IoT deployments. The open-source nature of Magistrala also means you can customize and extend the platform as your needs evolve.
Ready to explore? Start your free trial or dive into the docs.